Blogging with just written content can be very engaging to your readers and a great way to keep the conversation going. There’s nothing like photos or video, though, to really bring the conversation to a new level. Here’s how you put photos and videos on your WordPress Website.
This article will also be applicable to many other types of websites too. Many website interfaces are very similar and use the same methods, or very similar ones to achieve the same tasks. Hopefully, with some slight modifications, you will be able to apply this information to your non-WordPress website too.
Before you can upload a video or photo to your website, it will need to be in an acceptable format. Although this is really the subject of another article, let me take a moment to explain this. Many video and photo cameras use proprietary formats for their videos and photos. The RAW format that many high-end cameras can shoot in is an example of this.
Before these photos or videos can be used, they must be converted to a standard format that your website will understand and will be able to load quickly. The most commonly supported formats for web photos and images are JPG, PNG, and GIFF. You can tell if your image is in one of these formats by looking at the extension, or last three letters, in the file name.
For example, if I have a file named myphoto in JPEG format, it would look like myphoto.jpg. Most modern digital cameras have shooting modes that will create this type of file in the first place. This prevents having to do any conversions.
The standard formats for web video files are WMV, MOV, FLV, MPEG, and MPEG-4. Again, it is best to get your video into one of these formats before attempting to upload it.
After you have your photo or video in an appropriate format, now it’s time to get it online. There are basically two methods for doing this. Which one you use depends on a couple of different factors.
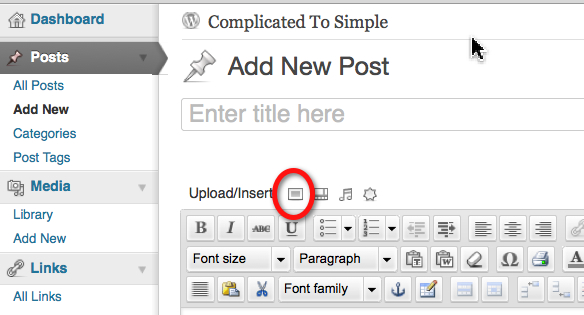
First, let’s look at photos or images. Since these should be of fairly small size, they’re ok to put on your own website. To do this, open up the dashboard for your WordPress website as shown below.
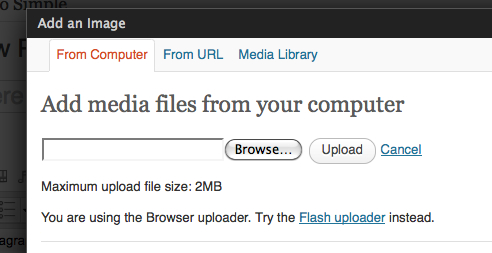
The image uploader is circled in the screen shot above. Click on this and the Media Library will open as shown below.
Click on Browse, find the file on your computer, and click on the file. It will be added to the box next to browse in this screen shot. Next click on Upload.
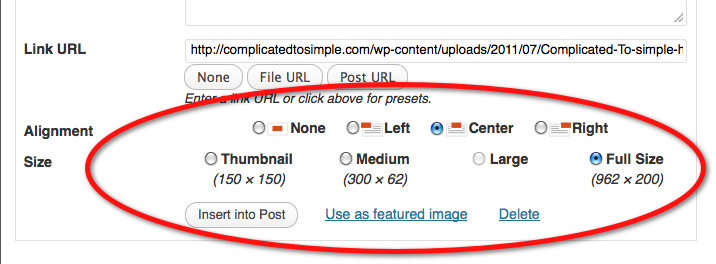
This screen shot is just the bottom portion of the screen that appears next. Select the alignment and image size and then click on insert into post. The image will be inserted wherever your cursor is on the post entry screen. The size can also be adjusted by dragging the boundaries of the image once inserted into the post.
For inserting videos, there are two choices. You can either put them on your site or host them on a site like YouTube or Vimeo. It is generally not recommended to host videos on your WordPress site. This is because the bandwidth of your site’s host could easily be exceeded if you have lots of visitors viewing your video at the same time.
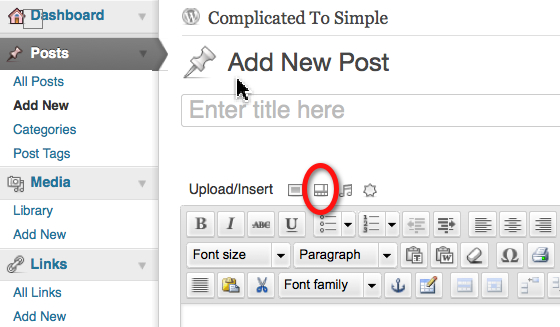
If you do choose to host them on your site you will be limited to two megabytes. To upload a video, you would use exactly the same process as for images with one exception.
Refer to the circled portion of the screen shot above. That is the video uploader. Simply click on that and proceed in the same way as you did for images.
For hosting videos on Vimeo or YouTube I will not go into how to get them on those sites in this article. That will be the subject of future articles. For now, you can go to either of those sites for instructions on how to use their sites.
For purposes of this article, we will look at how to get a YouTube video onto your site. Most other video hosting sites will use a similar process.
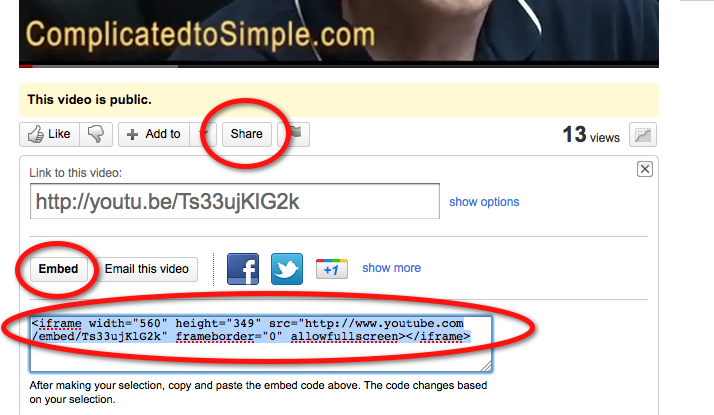
Once you have your video on YouTube, go to the actual video and click on it as if you were going to view it. The panel below the video, as shown in the screen shot above will appear. Actually, only the part above Link to this video will show up at first. Click on Share, and Embed, and the remaining part of the screen will appear.
If you just want to send your viewer to YouTube from your site, copy and paste the link in the Link to this video box. If you want to embed the video in your site so the viewer stays on your site while viewing, copy and paste the code in the box below the Embed button.
Go back to your WordPress post that you’re working on as shown below.
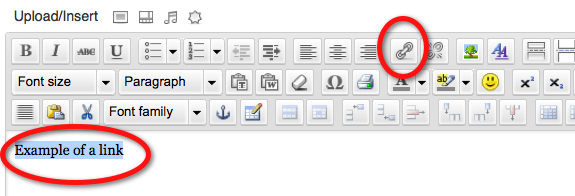
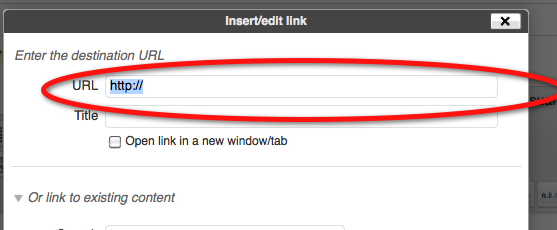
If you just want to link to the video and send your viewers off to YouTube, Type in some text that you want to use as the link. In this case I have used “Example of a link.” Highlight it and click on the link button as shown above. The hyperlink screen will open and you can then paste in the code that you copied off of YouTube from the Link to the video box. It goes in the circled box as shown in the screen shot below
If you want to embed the video, which is recommended so viewers stay on your WordPress site, do the following.
Click on the HTML tab. This will show you the HTML of your post instead of the visual view. Place your cursor where you want the video to show up. I know the HTML looks a little alien but look carefully and you should be able to tell where you want the video to appear. For simplicity, you might just want to insert it in the post before adding any text and leave it at the top of the post. To insert it, paste the embed code you copied from the YouTube embed box.
Be sure to save anything you do in the HTML editor before going back to the visual editor. On many platforms, if you don’t do this, your changes will be lost when you go back to the visual editor. Even if you’re just adding HTML tags to adjust the positioning, be sure to save first before going back to visual. Do this by clicking Save Draft, Publish, or Update.
When you go back to the visual tab, the video will appear as a blank box. This is how it should look. The video will appear normal when the post is viewed by your visitors.
So there you have it. As you can see, it’s pretty easy to add images, photos, and video to your WordPress website. Your viewers will appreciate having some video and pictures to look at instead of just text.
So now it’s your turn. How did you like this article? Are there other subjects you’d like to read about? If so, leave a comment. We’d love to hear from you! Also, feel free to join us on Facebook by clicking the “like” button in the “Find us on Facebook box” in the left sidebar
Thanks for visiting.
About Robert Seth
Robert  Seth is a CPA in the Clark County, Washington area who has been serving individual and small business clients for the last 25 years. His business includes a growing number of remotely serviced customers throughout the United States. He’s also a writer and technology expert. He has a passion for improving the lives of others by helping them simplify the complicated stuff in their lives.
