How to Extend MacBook Battery Life

How to Extend Macbook Battery LifeMake your laptop as portable, fun, and frustration proof as possible by taking these simple steps on How to Extend MacBook Battery Life. 

(Click Here for Windows version of this Article)

Apple continue to upgrade processors, memory, video cards, screens and all kinds of other things.  But if your MacBook battery life doesn’t last very long, all the rest can sometimes seem pretty useless.

After all, your MacBook is supposed to be portable.  If you have to stay plugged in all the time, it’s not much better than a desktop. 

You can’t do much about a battery’s maximum advertised time it will last between charges.  But there’s lots you can do to get the most from each one of those charges.

Of the things you can do to get the most minutes from a charge, managing screen brightness is probably the most important.  On a MacBook Pro 15” or 17”, this can make a difference of as much as three hours. 

To increase the battery time, try to keep your screen brightness as low as possible.  This can be controlled manually by using the F1 and F2 keys on your keyboard. 

Brightness control can also be controlled through systems preferences.  Click on the Apple menu and select System Preferences, Hardware, and Displays.

In this dialog box you’ll find a slider to control brightness.  It can also be controlled automatically by checking the box, Automatically Adjust Brightness. 

The beauty of checking this box is that you can still adjust the brightness manually.  So if you don’t like the setting the computer selects, you can adjust it yourself with the keyboard keys. This does not cause the Automatically Adjust Brightness box to become unchecked

While you’re in the Displays dialog box, notice the screen resolution settings.  The most efficient setting is the screens native resolution.  Changing this will make the screen somewhat easier to see (especially for older eyes). But it will also shorten the useful time between charges. 

Different color profiles will also have an effect on battery life.  The more basic the setting, the more efficient power usage will be. 

You can change the profile from the Displays dialog box. To get there, click on the Color tab next to the Display tab in the Displays dialog box.  Here you can select a preset profile, or invent one yourself. 

Another place to improve battery life is in the Power Saver settings.  To get there, go to the Apple menu, System Preferences, Hardware, and Power Saver.

Any boxes checked in this screen will help increase MacBook battery life.  Also, the farther you move the sliders on this screen to the left, the longer your battery will last.

The top slider controls when your computer sleeps.  Setting this too low will cause you to have to wake your computer up all the time.  So you’ll want to find a good compromise between battery life and system performance. 

The bottom slider just puts the display asleep sooner.  It wakes back up quickly though so you can set it very low without much inconvenience. 

Some Macs have dual video cards.  If yours does, there will be a box at the top of the Power Saver screen entitled Automatic Graphics Switching.

This is one of those ingenious Apple features.  Your computer has one basic video card for simple tasks and one advanced one for more difficult tasks. 

The advanced one takes much more power.  So if you check this box, the advanced one will only be used when necessary.  This can save lots of power and greatly increase  MacBook battery life. 

Another thing you can do to increase battery life is to only run the programs you need.  Try to close browser windows when not needed. Also close programs when you’re finished with them.  

However, this process only goes so far.  There are times when you simply will not be able to do much extending. 

Programs that use lots of system resource will use lots of battery power.  These include video, photo, or sound editing programs, and video intensive games.  When using these you’re going to get less battery time no matter what you do. 

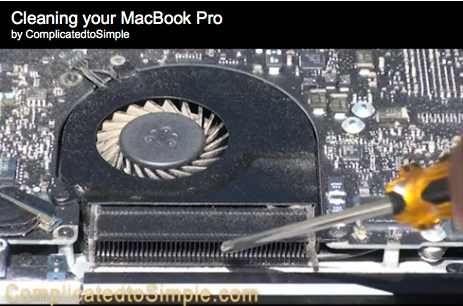
Another fairly easy battery extender is to keep your laptop as cool as possible.  Increased fan speed sucks battery power at an alarming rate. 

To keep fan speed as low as possible, keep you fans clean and try not to block your vents.  If you have a choice, try to use your laptop in the coolest place you can find. 

Fairly small increases in ambient air temperature can translate to big differences in battery life. If you think your fans might be dirty, click here to see my article on cleaning them.

Lastly, there is one more thing you can do to extend your battery life.  It’s not something you would normally think of.  However, depending on the extent of this issue, it can make the biggest difference of all.

This one thing is to keep your software and drivers up to date.  MacBooks do a fantastic job of this automatically by default.  Just make sure your default settings have not been changed. 

To check them, click on the Apple menu, System Preferences, System, and Software Updates.

Make sure you’re looking at the Scheduled Check tab.  For maximum automation, make sure Check for Updates and Download Updates Automatically are both checked.

The frequency of checking is up to you.  Weekly is probably adequate.  However, if you notice you battery suddenly not lasting very long, you might want to come in here and click on Check Now.

You can also check for updates by clicking on the Apple menu and just clicking on Software Updates.  Your computer will begin checking instantly.

I can’t stress enough how important this issue is.  Let me give you an example which is both extreme and quite recent.

I have Parallels on my MAC which is a program that allows me to run Windows (or any other operating system) on my MAC along with the MAC operating system. 

When I upgraded to Lion recently, my battery life went from 8 to 9 hours, down to about 1 to 2 hours.  This reduction was also accompanied by generally higher fan speed. 

The problem was that Lion required a whole new set of drivers and software updates.  If you made this switch to Lion, you probably noticed your computer doing lots of updates afterwards. 

Anyway, to make a long story short, my battery problem was completely solved by upgrading Parallels.  Parallels came out with an update the same day Lion was released. 

The upgrade was quite extensive and took a while to download and install.  However, the wait was worth it as it worked flawlessly afterwards.

The moral of the story is, when your computer asks if you want to install updates, you should allow it to do so as soon as possible. 

So there you have it.  If you keep these simple ideas in mind, you should be able to remain untethered from the power outlet for quite a while between charges. 

If you have a Windows computer, check out the Windows version of this article here.

If you enjoyed this article or have anything to add, I’d love to hear from you.  Please leave a comment.

If you would like more tips on improving computer performance, click here to grab a copy of our free video course on turbo charging your computer.

Thanks for visiting!


About Robert Seth

Robert Seth is a CPA in the Clark County, Washington area who has been serving individual and small business clients for the last 25 years. His business includes a growing number of remotely serviced customers throughout the United States. He’s also a writer and technology expert. He has a passion for improving the lives of others by helping them simplify the complicated stuff in their lives.


How to Stop a Frozen or Unresponsive Program in Windows

It seems no matter how sophisticated our computers get, we still have to deal with unresponsive or frozen programs

Last week’s article was about how to do this on a MAC.  Today we’re going to look at how to do it in Windows.

Click here to read the MAC version of this article.

Unfortunately, this does not usually work as well on a Windows computer as it does on a MAC.  Windows computers generally have more instances of programs freezing up.  They also have many more instances of the entire computer freezing up. 

That being said however, it still works quite often and can save you a lot of time.  It usually only takes a few moments to stop a program.  It can take many minutes to start Windows back up though. 

It’s also not good for your computer to be shut down in the middle of running something.  This can leave files in an open state instead of being closed in an orderly manner.  It can also cause information to be lost and your Windows installation to degrade over time. 

Always try to shut down a non-responsive or frozen program before hitting the power button and shutting the computer down.

Another thing to keep in mind is that this process of stopping a program can sometimes take a long time.  I’ve seen it take 10 to 20 minutes before.  I’ve also had seemingly stuck programs take that long to respond. 

What that means is sometimes we need to be very patient.  Let’s say you have Microsoft Word open.  You’ve been working on a very important 200 page document.  You click on print and then try to change the printer settings.

Suddenly everything stops and nothing inside Word will work.  This is the time to ask yourself a few questions.  Have you saved the file recently (you should save important files frequently!)

How important is this document?  How much time do you have to deal with this problem?  The answer to these questions will determine how you will deal with the problem.

Let me explain.  When a program freezes up, often times it is not permanently frozen.  As I said earlier, sometimes it can take as long as 20 minutes to respond.  If what you’re doing is really important, it’s best to let Windows figure out the problem.

Once the problem is figured out and the program responds again, don’t continue working. Close the program if you can and then shut down the computer using the shutdown command in Windows.  When it restarts, the problem will usually be fixed.

Just as Windows installations degrade over time, Windows sessions do too.  Shutting it down occasionally resets everything and will usually drastically improve your computing experience.

If the program will not quit no matter how long you wait, then you need to try and force it to quit.  The simplest way to do this is to right click on the program in the task bar and then click Close (Windows XP and Vista) or Close Window (Windows 7).  See the screen shot below.

 Again, give the program a chance to close before moving on to the next step or shutting down the computer.   

The other way to shut down a program is by using the Task Manager.  To start the Task Manager in Windows XP, press CTRL, ALT, and Delete at the same time.  Only do this once.  It may take a while to respond.  If you do it twice, when the computer does respond, it will shut down completely. 

In Windows Vista and 7 pressing these keys will bring up an intermediate screen where you can click on the Task Manager to start it.  To skip the intermediate screen, just press CTRL, SHIFT, and ESC.

When the Task Manager starts, go to the Applications tab.  Scroll down to the program you want to stop and then click on End Task at the bottom of the window.  Give the program adequate time to stop. 

If these methods don’t work, you will probably have to restart your computer to fix the problem.  If the rest of your computer is working, you might want to try doing something else and seeing if the program eventually stops. 

There is one more thing to show you.  If a program is frozen and your mouse is too, you may still be able to stop the program.  Windows has provided a way to do this just using the keyboard. 

Press the  Windows Start Key.  This has the Windows symbol on it and sometimes the word Start.  It’s between CTRL and ALT at the bottom left of your keyboard.

Picture of Windows key

In Windows XP, use the arrow keys to get to the Run command on the right side of the start menu. 

Run Command

When Run is highlighted, press Enter.  Type Taskmgr.exe in the box that comes up next.  Then tab down to OK and press Enter.

In Windows Vista and 7, just type Taskmgr.exe into the box that comes up after you press the Start (Windows) key.

The rest of this explanation is the same for all three versions of Windows.

When the task manager opens, use your arrow keys to select the Applications tab.  Then press the Tab key to go to the list of open programs.  Now arrow down to the desired program and press Alt E to end it.

If your mouse or keyboard is locked up during any of this, you will want to restart your computer after you get all open programs closed.  To restart using the keyboard (assuming it’s working) press CTRL, ALT, and Delete again, all at once.

So there you have it!  Now you know how to correctly stop a stuck program in Windows.  If you enjoyed this article or have something you’d like to share on this subject with my readers, please leave a comment.  it’s always a pleasure to hear from you!

If you you are enjoying the site, please click the “Like” Button in the “Find us on Facebook” box in the left sidebar.  If you’d like to learn more about making your computer work better, check out my free 5-day video e-course called How to Turbo-Charge Your Computer.  Just click here, enter your name and email, and you’ll get immediate access.  Your computer will love you for it!

Thanks for visiting!


About Robert Seth

Robert Seth is a CPA in the Clark County, Washington area who has been serving individual and small business clients for the last 25 years. His business includes a growing number of remotely serviced customers throughout the United States. He’s also a writer and technology expert. He has a passion for improving the lives of others by helping them simplify the complicated stuff in their lives.


How to Stop or Force Quit an Unresponsive Program on Your Mac

(Click here to read the Windows version of this article)

No matter how sophisticated our computers get, the problem of programs becoming unresponsive is still with us.

In mild cases, a program will just “hang” for a while.  If given enough time, it may become responsive again. 

In more serious cases, the program just stops working and you get a perpetual spinning color wheel.  In the more serious cases, the entire computer locks up and must be restarted. 

While this is usually more of a problem with Windows based computers, MAC programs do occasionally become unresponsive.  And while it takes much more to do it to a MAC than a Windows computer, a MAC will occasionally lock up and have to be restarted too.

What does not seem to be common knowledge among Windows or MAC users however, is that the computer does not necessarily have to be restarted if a program becomes unresponsive.  I’ve lost count of the number of time I’ve been told by a client that they just hit the power button when a program stopped working.  Restarting your computer by simply powering it off during normal operation is NOT recommended. 

The computer should never be shut down with the power button when programs are still open.  This can cause files on your computer to become stuck in an open state.  Normally when a program is shut down, all files are closed and updated in an orderly manner.  When not allowed to shut down in an orderly fashion, they can become corrupted and eventually not run at all.  Always try to shut your computer down by clicking on the Apple menu and then on Shut Down.

If a program become unresponsive or locks up, there are basically two ways to force it to close without shutting down the computer.  This assumes that only the program is unresponsive and not the whole computer.  If the whole computer will not respond, your only alternative is a complete shutdown.

The first way, which is the easiest, is to simply right click (two fingers on the track pad) the program in the Dock and select quit.  This is really the same as selecting quit inside the program.  However, since it’s outside the program, it sometimes works if the program has become unresponsive. 

If that doesn’t work, then you can use the Force Quit feature.  This can be accessed in two ways.  The first is to click on the Apple menu in the corner of your screen and select Force Quit.  This will bring up a list of programs that are running on your computer.

Select the one you want to force to quit by clicking on it and then on the Force Quit button at the bottom of the window.  In my experience this almost always works and a complete shutdown is usually not necessary. 

The other way to access the Force Quit option is by pressing the Command, Option, and Escape keys at the same time.  This will bring up the same menu as previously mentioned and you can proceed the same way. 

If none of these ways work, your only alternative may be to just power down your computer.  As I mentioned earlier this is not recommended.  But sometimes it’s the only way. 

If this happens more than once with a particular program you may want to investigate a solution before running the program again.  Programs that continually lock up can cause corruption in other parts of your system.  This is especially true if they cause you to have to power down the computer to restart. 

Hopefully this article will keep you from having to restart your computer quite so often.  It you have enjoyed it and it’s been helpful, please leave a comment. If you like the site, please click the “Like” button in the “Find us on Facebook” box in the left sidebar. 

Thanks for visiting!


About Robert Seth

Robert Seth is a CPA in the Clark County, Washington area who has been serving individual and small business clients for the last 25 years. His business includes a growing number of remotely serviced customers throughout the United States. He’s also a writer and technology expert. He has a passion for improving the lives of others by helping them simplify the complicated stuff in their lives.


How to Add or Remove Plugins From Your WordPress Website

If you’re new to WordPress, or even if you’re not, knowing about plug-ins is a must.  WordPress is an amazingly powerful and simple platform.  It can make you a web pro in no time even without installing any extra plugins.  But to really shine and get your WordPress site performing at its best, you’ll eventually need to know about plugins. 

The basic purpose of a plugin is to extend the capabilities of your site.  They can also greatly simplify something that would be very difficult to do otherwise.  For example, let’s say you want to add a contact page to your WordPress site.  With a plugin, it’s as simple as clicking on install and the job is done.  If you had to do that with HTML or PHP programming it would take you much, much longer.  That’s assuming of course that you even knew how.

Since most of us don’t know how, plugins are a tremendous help.  They make it so we can concentrate on writing great content, or doing whatever we do best, rather than learning to be a programmer.

Since the purpose of this article is not to tell you about all the plugins that are available I won’t go into any detail about that.  I will say however, that there are thousands of them to choose from.  This is very fortunate for anyone that wants to use WordPress as their blogging or web platform. 

Not only are there thousands to choose from, but there are many of each type.  This is also of great benefit to us.  Sometimes one plugin may not play well with everything else we’ve got going on with our WordPress site.  A good example of this is the post editor I use on this site. 

I began with a plugin called Dean’s FCKEditor.  It is a full-featured and very good editor and many people use it without any problem.  On my site however, it behaved very erratically.  It even caused me to have two of the same input windows right on top of each other.  This was definitely not how the software was supposed to work.

So, since I was familiar with another editor plugin called TinyMCE Advanced, I thought I’d give that a try.  It worked perfectly.  This is not to say that Dean’s FCK is a bad editor at all.  I just tell you this to provide an example of why it’s a good thing that we have so many to choose from.   It makes it so you can choose your set of plugins that will make your WordPress site hum along beautifully.

Now that you know what plugins are and why you need them, let’s talk about how to install and delete them.   Go to your WordPress dashboard and look at the menu items down the left side.  Find the Plugins category and click on Add New as shown in the screen shot below.

(Click on screenshots to enlarge and open in new window for better viewing)

The Install Plugins screen will come up next as shown in the next screen shot. 

In this window you have several choices.  You can either click on one of the choices circled above or you can do a search.  Clicking on Popular brought up the following screen for me.  What comes up for you will depend on what’s popular at the time you do this.  If you want to search, you can either enter a term, or leave the box blank.  Leaving it blank will bring up all plugins.  Entering a term will narrow your search considerably.

Notice that the page already knows what’s installed.  So for me, since Contact form 7 is already installed, it says so. 

In this case, NextGEN Gallery is not installed.  If you click on Install Now, it will do just that.  It will ask if you’re sure and if you click yes, the installation will be instant. 

Clicking on details will give you a chance to read about it and make sure it’s what you want as shown in the screen shot below. 

Clicking on Install Now will do the same as on the previous screen.

Once you install, you get the following screen.  Click on Activate Plugin to activate it and make it usable.  This is a good place to mention something else.  You do not need to activate plug-ins that are installed on your site.  You can also deactivate (which I’ll show you in a moment) a plug-in that you don’t want to use. 

There are many reasons for not activating every plugin.  You may want to test several plugins to see which one you like.  Maybe one stops working but you think the next WordPress update might fix it.  Deactivating makes it so you don’t have to download and install again in the event you want to reactivate.  I still have Dean’s FCKEditor installed on mine.  I’m hoping someday it will work again with my setup.  If I delete the plugin rather than just deactivating, I’d need to download and install it again. 

Some plugins require you to adjust settings once activation is complete.  There are far too many to discuss in this article.  I just want you to be aware that it’s normal to have to do this. 

Once your plugin is installed and activated, it will look like this in your plugin list.  To edit the settings, click Edit.  To deactivate, click DeactivateDelete will only appear for plugins that are not active because they need to be deactivated before deleting.

To finish up let’s show you what deactivating and deleting looks like.  Click on Deactivate and now the plugin looks like this. 

You may also see the following screen shot at the top of the screen depending on what other plugins you have installed. If you do see it, be sure to follow the instructions.

If you want to delete, click the Delete button that now shows up.  The following screen appears.  The system gives you plenty of chances to change your mind or to get additional information.  If you want to see what exactly will be deleted, click on the Click to view entire list of files which will be deleted option at the bottom of the screenshot.

Click on Yes, Delete these files and data.  The plugin will be deleted and you will see any appropriate messages at the top of the screen.  As before, be sure to follow any instructions given there. 

So there you have it.  That’s the basics of installing and deleting plugins on your WordPress Website. 

One other thing I should mention here.  Some types of WordPress installations do not allow you to change the plugin or they only allow you to select from a few.  My first website was like this.  I took a course called the Ultimate Internet Boot Camp.  During that course, we actually installed and set up our WordPress websites and did our first blog post. 

The course was great, but I soon learned some things that I didn’t think were so great.  You only had a choice between a few plugins.  Most of the ones that were installed were done in such a way that you couldn’t even see what they were and they could not be removed. One of the worst parts to me was that you could not even install a backup plugin so you could back up your site. 

I believe the reason they did this was so you couldn’t back it up and install it someplace else.  They did not want to lose their rather inflated hosting fee.  To get my site off their servers and onto someplace else was quite a job.  It required copying and pasting every piece of information on my site to another site.  It was really worth it though.  Now I have all the freedom WordPress has to offer without any artificial restrictions. 

If you are taking a course like that and you want ultimate control over what you do with your site, I would recommend getting off their servers as fast as possible.  The longer you wait the more information you will have to move.

If you enjoyed this article and it was useful to you, please leave a comment below.  If you like the site, please consider clicking the “like” button in the “Find us on Facebook” box in the left sidebar.

Thanks for visiting!   


About Robert Seth

Robert Seth is a CPA in the Clark County, Washington area who has been serving individual and small business clients for the last 25 years. His business includes a growing number of remotely serviced customers throughout the United States. He’s also a writer and technology expert. He has a passion for improving the lives of others by helping them simplify the complicated stuff in their lives.


How to Add Videos, Photos, and Images to Your WordPress Website

Blogging with just written content can be very engaging to your readers and a great way to keep the conversation going.  There’s nothing like photos or video, though, to really bring the conversation to a new level.  Here’s how you put photos and videos on your WordPress Website.

This article will also be applicable to many other types of websites too.  Many website interfaces are very similar and use the same methods, or very similar ones to achieve the same tasks.  Hopefully, with some  slight modifications, you will be able to apply this information to your non-WordPress website too.

Before you can upload a video or photo to your website, it will need to be in an acceptable format.  Although this is really the subject of another article, let me take a moment to explain this.  Many video and photo cameras use proprietary formats for their videos and photos.   The RAW format that many high-end cameras can shoot in is an example of this.

Before these photos or videos can be used, they must be converted to a standard format that your website will understand and will be able to load quickly.  The most commonly supported formats for web photos and images are JPG, PNG, and GIFF.  You can tell if your image is in one of these formats by looking at the extension, or last three letters, in the file name.

For example, if I have a file named  myphoto  in JPEG format, it would look like myphoto.jpg.  Most modern digital cameras have shooting modes that will create this type of file in the first place.  This prevents having to do any conversions.

The standard formats for web video files are WMV, MOV, FLV, MPEG, and MPEG-4.  Again, it is best to get your video into one of these formats before attempting to upload it.

After you have your photo or video in an appropriate format, now it’s time to get it online.  There are basically two methods for doing this.  Which one you use depends on a couple of different factors.

First, let’s look at photos or images.  Since these should be of fairly small size, they’re ok to put on your own website.  To do this, open up the dashboard for your WordPress website as shown below.

The image uploader is circled in the screen shot above.  Click on this and the Media Library will open as shown below.


Click on Browse, find the file on your computer, and click on the file.  It will be added to the box next to browse in this screen shot.  Next click on Upload.

This screen shot is just the bottom portion of the screen that appears next.  Select the alignment and image size and then click on insert into post.  The image will be inserted wherever your cursor is on the post entry screen.  The size can also be adjusted by dragging the boundaries of the image once inserted into the post.

For inserting videos, there are two choices.  You can either put them on your site or host them on a site like YouTube or Vimeo.  It is generally not recommended to host videos on your WordPress site.  This is because the bandwidth of your site’s host could easily be exceeded if you have lots of visitors viewing your video at the same time.

If you do choose to host them on your site you will be limited to two megabytes.  To upload a video, you would use exactly the same process as for images with one exception.

Refer to the circled portion of the screen shot above.  That is the video uploader.  Simply click on that and proceed in the same way as you did for images.

For hosting videos on Vimeo or YouTube I will not go into how to get them on those sites in this article.  That will be the subject of future articles.  For now, you can go to either of those sites for instructions on how to use their sites.

For purposes of this article, we will look at how to get a YouTube video onto your site.  Most other video hosting sites will use a similar process.

Once you have your video on YouTube, go to the actual video and click on it as if you were going to view it.  The panel below the video, as shown in the screen shot above will appear.  Actually, only the part above Link to this video will show up at first.  Click on Share, and Embed, and the remaining part of the screen will appear.

If you just want to send your viewer to YouTube from your site, copy and paste the link in the Link to this video box.  If you want to embed the video in your site so the viewer stays on your site while viewing, copy and paste the code in the box below the Embed button.

Go back to your WordPress post that you’re working on as shown below.

If you just want to link to the video and send your viewers off to YouTube, Type in some text that you want to use as the link.  In this case I have used “Example of a link.”  Highlight it and click on the link button as shown above.  The hyperlink screen will open and you can then paste in the code that you copied off of YouTube from the Link to the video box.  It goes in the circled box as shown in the screen shot below

If you want to embed the video, which is recommended so viewers stay on your WordPress site, do the following.

WordPress icon bar

Click on the HTML tab.  This will show you the HTML of your post instead of the visual view.  Place your cursor where you want the video to show up.  I know the HTML looks a little alien but look carefully and you should be able to tell where you want the video to appear.  For simplicity, you might just want to insert it in the post before adding any text and leave it at the top of the post.  To insert it, paste the embed code you copied from the YouTube embed box.

Be sure to save anything you do in the HTML editor before going back to the visual editor.  On many platforms, if you don’t do this, your changes will be lost when you go back to the visual editor.  Even if you’re just adding HTML tags to adjust the positioning, be sure to save first before going back to visual.  Do this by clicking Save Draft, Publish, or Update.

When you go back to the visual tab, the video will appear as a blank box.  This is how it should look.   The video will appear normal when the post is viewed by your visitors.

So there you have it.  As you can see, it’s pretty easy to add images, photos, and video to your WordPress website.  Your viewers will appreciate having some video and pictures to look at instead of just text.

So now it’s your turn.  How did you like this article?  Are there other subjects you’d like to read about?  If so, leave a comment.  We’d love to hear from you!  Also, feel free to join us on Facebook by clicking the “like” button in the “Find us on Facebook box” in the left sidebar

Thanks for visiting.


About Robert Seth

Robert Seth is a CPA in the Clark County, Washington area who has been serving individual and small business clients for the last 25 years. His business includes a growing number of remotely serviced customers throughout the United States. He’s also a writer and technology expert. He has a passion for improving the lives of others by helping them simplify the complicated stuff in their lives.


How to Clean the Dust from the Inside of Your MacBook

Your MacBook laptop needs the dust cleaned out periodically to keep it in top working order.  Here’s how to do it yourself and save some time and money!

Your MacBook laptop is much more sensitive to dust accumulation than a desktop.  This is because desktops have more room and larger fans to dissipate the heat.

By comparison, your MacBook laptop has very small fans with even smaller heat exchangers that look like tiny car radiators.  This is necessary because of the limited space inside of the MacBook.

With the introduction of the sleek and slim design of Apple’s newest MacBooks, getting rid of extra heat became an even bigger challenge.  Apple created an engineering marvel, however, that does a great job of getting rid of most of the heat most of the time. 

Trouble comes when the machinery that performs this marvel starts getting coated with dust.  Dust acts like insulation inside the computer.  It does not allow heat to be transferred from internal components to the outside air.

It also clogs up passageways that are designed for heat to escape through.  As dust builds up, your MacBook has to work much harder to get rid of extra heat.  You will start to notice more noise as the fans run faster and longer. 

Your MacBook will also run hotter and may become quite uncomfortable to hold on your lap.  You may also notice your battery running down much faster.  Excessive fan speed drains battery power very quickly. 

Cleaning the dust out is easily performed with a couple simple tools.  All that is necessary is a screwdriver and a can of compressed air. 

Be sure your MacBook is turned off before you begin.  Flip it over so the bottom is facing up.  Remove all the screws you see on the backside of the computer. 

A number zero Phillips screw driver is the perfect size for this task.  It is available at Radio Shack and most hardware stores.  You will want to purchase one as this task should be performed on a regular basis. 

If your home is on the dusty side because of pets or a wood stove, you’ll probably want to do it more frequently.  Perhaps as often as every three months.  Otherwise, every six months or longer may be appropriate. 

After you remove the back, the fans and small metal fins near them should be clear to see.  Watch the video to see what they look like.

Photo of Mac Fan and Fins

Try not to touch any electrical connections with your fingers, tools or anything else while performing this maintenance.  Technically, you should never touch electronically sensitive parts of your computer without first grounding yourself. 

Since we won’t be touching any of that kind of stuff though, you should not have a problem.  Just remember though that every electronic repair carries with it some risk of damage. 

Even changing the batteries in a flashlight can cause damage to the bulb.  So if you are unwilling to accept any risk, it may be best not to perform this operation.  Ok, now that I’ve gotten the legal stuff out of the way, let’s move on.

Again, take a look at the video to see how to do this.  You will need a can of compressed air for the next step.  I recommend you do this outside.  The clouds of dust that can come from a dirty computer can be surprisingly large.  You don’t want to spend the rest of your day dusting your house to get rid of the fallout. 

Aim the straw on the can into the metal fins that are next to the fan.  Use the air in short bursts.  If you keep blowing for too long at one time, the can will become too cold causing a pressure drop.  You will then need to let it warm up again before continuing. 

Next, blow off the fan blades themselves.  Try to prevent very much spinning when you do this.  You might want to hold the blades gently in one place while cleaning.  According to a MAC tech I spoke to recently, the fans are quite delicately balanced and could be damaged by allowing them to spin too much.  Continue shooting air into all the nooks and crannies until you no longer see any clouds of dust come out.

When spraying, try to keep the can as close to upright as possible.  If it’s tipped too much or turned upside down, the coolant can be expelled as liquid instead of a gas.  The coolant inside these cans is usually liquid carbon dioxide. 

It is cold enough to cause instant frostbite if it contacts your skin.  It can also cause damage to warm computer components due to the instant and extreme temperature change.  So do your best to keep just gas coming out of the can and not liquid.

When you’re done, simply reattach the back of the computer in the same manner that you took it off.  Be sure to get the right size screws back in the right holes. 

When turning the screws back in, don’t tighten them too much.  They should be snug but not overly tight.  If you turn them too hard, they can strip out the threads in the holes they go into.  If this happens, it will be nearly impossible for that hole to ever hold a screw again.

Another thing to be careful of is cross-threading.  It’s very easy to get these tiny screws in crooked.  If you feel the screw is difficult to turn in right from the beginning, back it out and try again. 

Do this as many times as necessary to get the screws in straight.  You’ll know it’s straight when it’s easy to turn in the whole way until tight. 

That’s about it.  This is a very easy repair and one that you can do at home for almost no cost.  You’ll be glad you learned how to do this.  Especially when the warranty on your MacBook runs out and you have to start paying for service. 

By the way, this is an Apple approved user repair.  That means you can do it yourself without risk of voiding your warranty.

If you enjoyed this article and video, please click “like.”  You can also connect with us on Facebook through the “Find us on Facebook” box in the left margin. 

We would love to hear from you.  If you have something you’d like to share, please leave a comment.

Thanks for visiting!


About Robert Seth

Robert Seth is a CPA in the Clark County, Washington area who has been serving individual and small business clients for the last 25 years. His business includes a growing number of remotely serviced customers throughout the United States. He’s also a writer and technology expert. He has a passion for improving the lives of others by helping them simplify the complicated stuff in their lives.


A Step-By-Step Action Plan For Writing an eBook


When writing an eBook, or anything else, it helps to have an actionable checklist to keep you on track.

Recently, after finishing my eBook about how to create an eBook, I received some interesting feedback. 

Let me explain.  This whole process started a few months ago when I decided to write an eBook to help writers with creating an eBook.  It was intended to simplify the often very complicated technical aspects of the process.  What I came up with was a tool that literally removed every technical barrier to eBook creation.  It was so simple that even a complete computer newbie could do it. 

After the eBook was finished, I was curious if there were any other kinds of barriers people experience.   So I presented that question to an internet business coaching group of which I’m a member.  This was a perfect group to ask for feedback because most were interested in writing eBooks and many had already purchased my eBook. 

The feedback I received was quite surprising.  When I began this effort to simplify the writing of eBooks for people, I assumed that most of the barriers were technical.  After all, those were the types of questions I was usually asked.  Nobody ever mentioned any other barriers.  Interestingly, it was not until the technical barriers were removed that the other barriers emerged. 

It was kind of like peeling back the layers of an onion.  Each type of barrier was like one layer of the onion.  As one was peeled back, another would emerge.  Each layer was independent of the others and it was very difficult to see more than one layer at a time. 

In addition to the technical, these writers struggled with two other types of barriers.  Emotional barriers such as self-doubt and inadequacy as a writer were one type.  Another was not having a plan which caused great difficulty in knowing where to begin. 

Let me tell you, after going through all this, it was no longer a mystery to me why so many people fail to realize their dreams of becoming a writer!  These people have so much to offer the world.  It is very unfortunate that these barriers may be responsible for us never seeing much of the work these talented writers could have produced.   It’s equally unfortunate that these writers may never be fulfilled by realizing their dreams.  

It seems I had stumbled upon a much bigger problem than I had originally intended to solve.  So with all this in mind, I decided to add to the simplification process I had already started. 

I began by writing a supplemental report that would help writers get over the emotional barriers.  This report is available for free from this website.  If you would like to read it, just fill in the box at the top of the right sidebar next to this article.  It will be sent to your email immediately. 

My next step in the solution is this article you’re reading now.  In order to get started, it’s important to have a plan.  That way important mental energy is not wasted on constantly trying to figure out what to do next. 

So here is your actionable, step-by-step process to get your amazing eBook out to the world!

Decide What You’re Going to Write About

That statement may seem obvious, but let me explain.  It is important to determine the purpose and scope of your eBook right from the start. 

Without definite boundaries, your subject matter will tend to wander.   It will seem to you like your eBook will never end because there will be no end to what you could add.  You will also frustrate your readers as they try to follow the aimless wanderings that will naturally result.

At first, define you subject tightly.  Decide on your general subject and what sub-categories you will write about.  Making a list or an outline can help with this.  As you write, refer back to this list.  Make sure everything you write fits under the categories of the list. 

Be ruthless about this.  If something doesn’t fit, strike it!   Even if whatever you just wrote was amazing.  If you don’t want to lose it, you can always save it to a snippet file.  But remove it from the current project.

Do Your Research

There are no hard and fast rules for this.  The amount of research to do before you begin is a subjective thing.  It depends on your writing style and your brand of barriers. 

What’s important is to make sure it does not become a barrier!  You need to do enough research to know your subject.  It’s also good to know you’ve generally covered your bases and haven’t left out anything important. 

It is not necessary to know every tiny little detail before you start. 

Check Your Toolbox

Make sure you have the proper tools and they’re in good working order.  This is necessary for any craftsman.  If a carpenter’s tools are broken, dull, or he doesn’t have the right ones, he will not be successful.  The same is true for writers.

Check your software to be sure you have all the programs you need to complete the project.  Be sure your software has all the features you need.   Make sure all your software works on your computer.  Be sure all updates are installed on your computer.  This includes hardware driver updates as well as application program updates. 

It is very frustrating to begin a writing project and be constantly plagued by technical interruptions.  If there are enough of them, it can completely derail your creativity.  Be sure your tools are in good working order before you begin.

Remove Environmental Barriers

Just like inadequate tools, environmental barriers can stifle the creative process too.  Make sure you have a quiet place to write without interruption or distraction.  Turn off your email program and your telephone. 

If you have children or other responsibilities, try to pick a time when you are least likely to be interrupted.  If necessary, hire a babysitter and go to the library.  If you have a favorite place like the beach or a park, these places can contribute greatly to a proper writing mood. 

Make sure you are comfortable.  Proper clothing, furniture, nutrition, hydration, and sleep will all contribute to success in this area. 

Start Writing!

This is another subjective area of writing.  Some writers stick closely to an outline while others just start anywhere. 

The important thing is that you start!  This seems to be a sticking point for lots of writers.  It shouldn’t be.  It doesn’t matter where you start.  Just begin writing and it will become easier as you go. 

Just remember that you only need to actually start once.  So the sooner you do it, the sooner you can move on.

 Wrap It Up

The category has a dual meaning.  First, wrap it up as in finish it up.  Finish writing and check your spelling and grammar.  It’s a good idea to have some help with this as it’s very difficult to edit your own work.  Make sure you have included everything you intended.  Also make sure you didn’t include anything outside your scope. 

Secondly, decide on what kind of wrapping you want.  This includes things like page and page number styling as well as cover design.  You can do this yourself or outsource the task. 

Publish

The steps involved in publishing will depend on how you intend to distribute your eBook.  Just emailing your eBook requires very different steps than hosting, distributing and selling it online.  If emailing, you will mainly just need to convert your eBook to electronic format and secure it.  If distributing online, you will also need to get it to your website, set up a delivery method, and decide on a way for your buyers to pay for it.

Conclusion

Naturally there will be variations on the steps I have outlined here.  However, if you stick to these general guidelines your eBook journey should be fairly straightforward and painless.

I have also only included the basics of each step here.  That’s because this is just supposed to be a checklist to help you get moving in the right direction.  For more detailed help, be sure and pick up a copy of the free report I mentioned earlier in the article. 

For complete coverage of this topic, I recommend checking out my eBook as well as picking up the free report.  You can go directly to the eBook sales page by clicking here.  Just a little hint though.  The free report has a special eBook bonus at the end so you might want to read it first! 

Was this article helpful to you?  Do you have additional suggestions for our other readers?  If so, please leave a comment here or on the Complicated to Simple Facebook Page.  You can join us on Facebook by clicking the “like” button in the “Find us on Facebook” box in the left sidebar.

Thanks for visiting!


About Robert Seth

Robert Seth is a CPA in the Clark County, Washington area who has been serving individual and small business clients for the last 25 years. His business includes a growing number of remotely serviced customers throughout the United States. He’s also a writer and technology expert. He has a passion for improving the lives of others by helping them simplify the complicated stuff in their lives.


How to Fix or Tune up a CD or DVD Drive and Maintain it in Top Condition

CD and DVD drives are high precision devices that need occasional maintenance to stay in top shape.  In this article we talk about how they work and what to do to keep yours at its best.

Have you ever slipped a CD or DVD into your computer or DVR drive only to get lots of noise but no action?  I’m pretty sure this has happened to most of us.  When it does happen it’s easy to assume the drive is broken.  This is often not the case though.  The problem is usually that the drive is just dirty. It takes a surprisingly small amount of dirt to cripple a CD or DVD drive.  Before we look at how to clean one, let’s take a look at why it’s so easy to mess one up in the first place.

The photo on top is of a typical CD/DVD drive reading mechanism.  The critical part that we’re concerned about is the little blue object inside the red circle.  This is a tiny lens.  The penny on the bottom is provided for a size comparison.

A laser beam is used to read the information on the disk.  The beam is reflected off the disk and then passes through this lens when the drive is reading information.  The lens is supposed to keep the beam in focus at all times by varying the distance between the disk surface and itself.

This laser beam and the information it must read are very small.  Let me give you an idea of just how small.  The data on a DVD is arranged in a spiral shaped track.  The track has approximately 50,000 complete turns and is almost 39,000 feet long!

In order to fit that long of a track on a disk, the width of the track is only .4 microns.  A micron is really, really small!  A human hair is about 25 microns.  That means it would take about 62 tracks to equal the width of a human hair.  So you can see (actually you can’t because it’s so small) how small all this stuff is.

With the information on the disk being so tiny, the laser has to be controlled and focused very precisely.  That’s where our dust and dirt comes in.  It only takes a little bit of dust on the lens, in just the right place, to get in the way of the beam.  This causes it to become out of focus making it much more difficult to read the information correctly.

If it becomes too out of focus, it will not be able to read the disk at all.  The drive will just spin and make noise as it tries every way it can to read the data.  So if your drive is working poorly, or not at all, there’s a good chance that it’s only dirty and not really broken. 

Let’s look at a couple of different ways to clean the dust off and bring your drive to practically new condition.

The first method is fairly simple and straightforward.  It’s also pleasantly inexpensive.  It involves nothing more than a can of compressed air!


The little straw attached to the nozzle of these cans is perfect for getting into tight places.  If your drive is a drawer type, make sure it’s open when you clean it.  If it’s the kind that sucks the disk in through a slot, just insert the straw a little ways into the slot.  Make sure there is no disk in the drive before doing this.

Move the straw back and forth, and in and out, as you press the trigger to blow in the air.  Do this fairly quickly as the liquid in the can will soon become quite cold and lose its pressure.  If this happens, you will need to let the can warm up again before continuing.

Be very careful to keep the can upright.  If you turn it sideways or upside down you can blow pure liquid coolant into the drive or get it on yourself.  This is not good for the computer or you.  The liquid is usually carbon dioxide and is cold enough to cause instant frostbite.  It can also cause electronic parts to malfunction or crack if their temperature goes from warm to freezing in an instant.  

I find that this method works very well most of the time.  How well it works for you will depend on how dirty the lens has  become.  Sometimes there’s just too much dirt to blow it all away.  After using this method try playing a CD or DVD to see if the problem has been fixed.

If the blower method does not work, you can try the cleaner-disk method.  A cleaner disk looks like a regular disk except it has little microfiber brushes on it that stick straight up off the surface of the disk.  They look like a bunch of tiny little eyelashes.

Memorex CD/DVD-Player Laser-Lens Cleaner


(For more information, or to purchase this item, click on the image).

As the disk turns in the drive, these little brushes hit the lens surface and clean the dust off.  Kind of like when you use a feather duster to dust the stuff in your house.  Cleaner disks sometimes come with a little tube of cleaner that helps remove the dust and also neutralizes static so dust does not stick so easily.

To use the disk, simply insert it into the drive and follow the instructions on the screen.  Even if your drive won’t read a disk, the brushes will begin to clean the lens as soon as the drive begins to spin.  It may take a few minutes, but eventually the instructions should come up on the screen. 

There will usually be several different cleaning cycles to choose from.  In addition to instructions, it may also have music for you to enjoy while the disk is doing it’s job.  The computer will tell you when the cleaning is done.  Just remove the disk and hopefully your drive will be good as new.

In all the years I’ve been working on computers, I have rarely seen these two methods fail. Disk drives do wear out occasionally but not very often.  It’s usually the ones inside hard-core gaming machines that fail on a regular basis.  Regular business and home machines are more likely to fail from dust buildup because of disuse than from wearing out.

I have had many drives that I’ve moved from machine to machine as I’ve rebuilt them every couple of years.  Usually if they are retired it’s because more advanced technology becomes available.  Not because they break.

If these two methods don’t work, try checking the cables inside the computer.  One of them may be loose.

Another thing to try before assuming the drive is dead is rebooting the computer.

Lastly, it’s possible that the disk you’re trying to use might be damaged.  Try several different disks before giving up and replacing the drive. 

If you do find that one of your disks is scratched, check this article that I wrote on removing scratches for an inexpensive and very easy way to repair it.  This repair will only work for scratches though.  If the disk is cracked, warped, or otherwise seriously damaged, it will need to be replaced.


There is one other thing I should mention here.  There are other high precision parts inside a CD/DVD drive beside the lens.  Another place that dust and dirt can cause a problem is in the tracking mechanism which moves the lens across the disk.  This tracking mechanism is more robust than the lens so it can take more dirt and abuse before it fails.

The two things that will cause it to fail are a very large buildup of dust, or extreme physical abuse.  If too much dust is allowed to build up, it can get packed into various places inside the drive.  This can prevent the reading mechanism from being able to move to either the extreme beginning or ending point on the disk.

In cases like this, even though there is nothing really wrong with the drive, it is not usually financially practical to fix.  It involves removing the drive, disassembling it, and removing the obstructing dust buildup.  If you have a professional do this for you it will probably cost more than a new drive.

If you are a do-it-yourself type though you might want to give it a try.  All you have to lose is an already dead drive.  It’s also a great learning experience so you can see what’s involved for yourself.  Besides, you might actually fix it and not need to spend the money for a new one after all.

The moral of the story is to maintain your equipment.  It’s a good idea to get a can of air and a cleaner disk and use them once a week or so.  By keeping the dust cleaned out on a regular basis, your drives should last many years and possibly longer than the computer. 

If you have enjoyed this article please click the “like” button.  Also consider joining me on Facebook by clicking the “like” button in the “Find us on Facebook” box in the left sidebar.

Now it’s your turn.  If you have something to add or know of other good tips for keeping drives in top condition, I’d love to hear from you.  Please leave a comment so everyone can benefit.

Thanks for visiting!


Robert Seth is a CPA in the Clark County, Washington area who has been serving individual and small business clients for the last 25 years.  His business includes a growing number of remotely serviced customers throughout the United States. He’s also a writer and technology expert.  He has a passion for improving the lives of others by helping them simplify the complicated stuff in their lives.