When Should I Replace My Computer?

The question of when to retire a computer is a subjective one at best.  It depends on many things.  However, there are some basic rules of thumb you can use to help make the decision easier.

The first question to ask yourself when considering computer replacement is, “why do I want to replace my computer?”  The answer to this question will be very helpful in deciding if it’s a good idea.

If your “why” is that you’re just tired of your old one and want something new, then by all means, indulge yourself.  In this article I’m not addressing the question of affordability or if your spouse thinks it’s a good idea.  You’ll have to decide those issues for yourself.  The purpose of this article is to address the technical aspects of the decision.

If your “why” is that the old one doesn’t perform up to snuff or won’t run some of you programs, that’s a different story.  Then you need to look at some other things before making your decision.

Very often, a computer’s performance problems are caused by things we can easily correct.  If your hard drive is too full, you can clean it up.  If too many programs are running at once, you can control which ones start and which ones don’t.  The performance settings can also be tweaked to best fit the kind of work you do.  I won’t go into how to do any of that here.  I do however go into quite a bit of detail about it in my free  “How to Turbo-Charge Your Computer” video e-course.   You can get instant access to that course by clicking here.

If you’ve tuned up your computer and that hasn’t helped, there may still be a thing or two you can do before purchasing a new one.

One of the most common things to do is reload the operating system.  This is not usually necessary on Macs (but sometimes it is!).  It definitely applies to Windows computers though.   The older your version of Windows, the more you will probably gain by doing this.

Windows XP especially benefits from an occasional reload.  I like to compare Windows XP to the old Pac Man game.  You remember…the one where the little yellow chomping faces eat up everything in their path.  Well, that’s how Windows acts too.

Each time you start up Windows XP, the longer you go before restarting, the more the system performance degrades.  It’s like the little Pac Men eat up more and more pieces of your system until it won’t run anymore and needs to restart.  The problem is, it’s like that in the long run too.  The more months and years you go without reloading, the more your system degrades.

So the question becomes, do you want to reload and have an OLD computer that works like it did when it was new?  Or do you want a new computer that runs like new and will do so for a few years?

The most I’ve ever gotten out of a Windows XP installation was about 5 years.  Admittedly, I probably run my computers far harder than most people do.  If all you do is browse the internet and read email, yours may last much longer.

I knew it was time to reload when I could only start up QuickBooks one time.  If I closed it and tried again, it would not start without restarting the computer.  Also, if I wanted to change printer settings, it took nearly 10 minutes for the dialog box to come up.  Normally, it should come up instantly.

I figured out that Windows was the problem and not the hardware with a novel test process that cost me nothing.  I just reinstalled Windows on a new partition of my hard drive.  Since it was on the very same hardware, the only difference was that the installation was new.  It worked beautifully…just like new!

However, even though this worked, I decided to replace the computer anyway.  As I said earlier, there are many reasons for replacing a computer.  In this case, I didn’t want to go to all the trouble of reloading all my programs (many, many programs!) and still be on the same ancient hardware and operating system.  This process takes over a day and I’d much rather have sometime more modern to show for my work.

On the other hand, if you have an abundance of time and don’t wish to spend the money on a new computer, you may want to give this a try.  It’s quite easy to do.

Just back up your data to a USB drive and make sure you have installable copies of any programs you want to keep.  You also will need a copy of Windows.  You don’t necessarily need YOUR copy of Windows.  As long as you record your license number before erasing everything, just about any copy of Windows will do.  Just make sure it’s the same version of Windows as your license number is for.  The one exception I’ve run into is if you have a copy of Windows that was made for a specific computer.  Sometimes it will only allow installation on the computer it was made for.

Many computers have a recovery drive on them.  If yours does, it should have a recovery program on it too.  This program, when started, gives you the opportunity to change your computer back to the exact state as when it was new.  You’ll be amazed at how well your old computer will work after you do this.  Just like new!

If you have no copy of Windows and no recovery drive, you can often use a friend’s copy.  You can also buy a copy on Craigslist or EBay without a license number since you already have your own.   I recently purchased a copy of Vista this way for around $5.  This is perfectly legal and can be installed as many times as you like as long as you have a unique serial/license number for each computer you put it on.

If you commonly use software that is upgraded regularly, you may not want to do this.  As I said, you end up with an old computer that runs like it did when it was new.  That may not be adequate if you’re trying to run software that was written years after that computer became out of date.  That’s one reason I generally build a new computer instead of reloading Windows after years of use.

Just remember to tune up your computer before you make any decision to replace it.  Not doing so is like selling your car because it needs an oil change or a tune up.  Of course your car will run poorly if not maintained!  The same goes for your computer.

So grab a copy of my free video e-course and make it run like new again.  You should see significant improvements in speed, less locking up (or none), and no more blue screens of death.  You’ll be able to spend your time on those important, fun things in life instead of constantly waiting for your computer to respond.

It will make your computer fun again and your computer will love you for it!

If you still don’t’ like your old computer after going through the course (and maybe reloading Windows), at least you’ll know that you did everything you could to get the best from it.  You’ll also have the immense satisfaction of not having to pay anyone to check out an old computer!  You can go shopping with a clear conscious and have fun finding a new computer!

If you enjoyed this article, please click the Facebook “like” button at the top left of this page.  Feel free to share it with your friends too.  If you have questions, please add them to the bottom of this page.  I try to answer all your questions as soon as I can.

By the way, as an added bonus, if you get the free video e-course I mentioned, you’ll also get free access to our e-zine that’s packed with other tips and tricks to simplify your life!

Thanks for visiting and I look forward to seeing you back here soon!


About Robert Seth

Robert Seth is a CPA in the Clark County, Washington area who has been serving individual and small business clients for the last 25 years. His business includes a growing number of remotely serviced customers throughout the United States. He’s also a writer and technology expert. He has a passion for improving the lives of others by helping them simplify the complicated stuff in their lives.


IRS Targets Favorite Tax Saving Strategy

Are you, or do you plan to be, a single owner or shareholder in an S Corporation?  Are you, or are you planning on, using the low payroll strategy to minimize payroll taxes?  Well read on, as this issue is being revisited by Congress and the IRS and the climate is definitely changing.

As you may already know, S Corporation enjoy a tax advantage that can save their shareholders a considerable amount of money.  They are allowed to decide how much of their income from the S Corporation that they are going to call payroll.  The rest escapes social security and medicare tax.

For years this has been a planning tool to keep taxes at a reasonable level.  When you combine this benefit with the fact that S Corporations also escape the double level of taxation incurred by C Corporations, converting to this type of entity can make a lot of sense.

As I said, this has been an effective planning tool for many, many years.  Unfortunately, it has also been abused for many, many years.  There’s an old saying in this industry that says pigs get fed and hogs get slaughtered.  It’s one thing to take advantage of a tax law.  This is legitimate and wise.  It’s quite another to abuse one.  This just makes you a target for litigation and increases your chances of coming out much worse than if you had been conservative in the first place. 

In the past, when the IRS has taken taxpayers to court over this issue, they have lost almost every time.  Historically, they were only successful when the taxpayer recorded no payroll at all!  When some payroll was recorded though, the IRS had an uphill battle and usually lost.

This climate is changing though.  In our current revenue hungry environment, the government is looking hard for new sources of cash.  One example of this is legislation that made it through the House last year.  It would have required all employees and shareholders of personal-service companies – consultants, lawyers, and accountants for example – to pay payroll taxes on all their profits. 

Fortunately this did not make it through the Senate.  If it had, it would have cost these companies a tremendous amount of money.  It also would have caused the IRS to be seeing dollar signs everywhere and smiling from ear to ear. 

Another occurrence indicative of this climate change is the recently litigated case between the IRS and David E. Watson, a CPA in West Des Moines, Iowa.  In this case, Mr. Watson’s share of his firms profits was around $200,000 for each of two years.  During those two years, he paid himself only $24,000 in salary.  The IRS felt this was really abusive and litigated the case in District Court.  The judge agreed with the IRS and David ended up paying payroll taxes and penalties on $91,044 instead of $24,000. 

Now there are a few things to be said here.  First of all, there is no law that says you have to pay yourself a specific amount.  What’s reasonable is a subjective question and one of those gray areas of the tax law.  However, as I said in the beginning, pigs get fed and hogs get slaughtered.  Had David been more conservative in the beginning, he may never have found himself in court.

David was pretty fortunate in that the only reason the IRS didn’t shoot for a higher number is that it would not have done them any good.  The years in question were 2002 and 2003, when both social security and medicare taxes were capped.  In more recent years medicare has no cap so the IRS tries to argue that all profits should be reclassified as payroll!

David says he’s going to appeal the case.  By the time he’s done though, even if he wins he may never recover his court costs and loss of time.  Not to mention the precedent that has been set by this case.  The moral of the story has always been to avoid being abusive.  I believe any competent tax adviser would have advised against David’s strategy.  As tax advisers, we often spend lots of time convincing our clients to keep their salaries reasonable. 

If you are in this same situation, just be aware that the climate is changing like it never has before.  The IRS is probably going to be much more bold now that they have won this case.  If congress passes legislation in this area it may all become a moot point.  We’ll all be paying employment taxes on everything! We can all help prevent that legislation though by not being abusive.  Congress passed the S Corporation rules in the first place to help ease the tax burden on small companies.  Until recently, they have been hesitant to step in and change things. A rule change in this area would be a tremendous burden on everyone.  But if the abuse continues,  it will force their hand.

If you don’t welcome trouble from the IRS, I would recommend that you keep your salary on the high side of reasonable.  In the end, what’s reasonable is a matter of opinion.  That opinion is based on a fairly long list of considerations.  If you’re uncertain what’s reasonable, a visit to your tax adviser may be in order. 

If you enjoyed this article or are interested in hearing more on this subject, please leave a comment.  Also, feel free to “like” our site by clicking the like button in the Facebook box.

Thanks for visiting!


About Robert Seth

Robert Seth is a CPA in the Clark County, Washington area who has been serving individual and small business clients for the last 25 years. His business includes a growing number of remotely serviced customers throughout the United States. He’s also a writer and technology expert. He has a passion for improving the lives of others by helping them simplify the complicated stuff in their lives.


Why You Shouldn’t Pay Personal Expenses From Your Business Account


We’ve all heard the advice that we should keep our business and personal finances separate.  This has always been good advice.  Depending on the type of business entity you started, it may not have actually been necessary, but it was still a good idea.

There are some very good reasons for this separation.  One of the reasons for writing this article is to help protect you from the IRS. So we will talk about that first.  Then we’ll talk about some other reasons that may or may not apply to you.

First let me tell you a little bit about IRS audits.   Most of them are not the all-encompassing horror stories you hear about.  Most are done by mail or in the IRS’s office and focus on a specific area.  For example, the IRS may ask you to verify your mileage for the year by showing them your mileage log.  Or they may ask you to prove another area by showing them your accounting records.

This request for accounting records is what this article is all about.  In the old days, when records were kept on paper, it was easy to just show the IRS the particular expense category they were interested in.  You could bring in worksheets backed up by the specific receipts for each expense.

In this day of computers though, it has become both easier and more difficult at the same time.  It’s easier in that the actual act of accounting is easier and much less time consuming.  It’s more difficult though, in that it can be very challenging to just show the IRS what they want and nothing else

According to recent regulations, it is allowable for an IRS agent to request you actual QuickBooks file.  Agents are being officially trained in the use of QuickBooks so they know how to work with these files they get from taxpayers. 

If the problem with this is not obvious to you, let me explain why you should be concerned.  By giving them access to your whole accounting data file, they can see everything!  Now, instead of just seeing the area of interest, they can see everything you spent on anything. 

An agent, when getting a file like this, is supposed to only look at the area in question.  The IRS has even been publishing guidelines for agents to make sure they don’t look any further.  However, they are only human, just like you and I, and you know what they say about curiosity

It’s bad enough that all your records are there for them to see if they choose to deviate from their rules.  What can be even more of a problem though is if your personal records are there for them to see too. 

Please don’t get me wrong here.  I never advocate cheating on your taxes.  I fire clients immediately if I suspect they are falsifying any of their records.  The problem is, if they can see your personal records too, it can cause the audit to become much longer and more costly

Unfortunately, the IRS, under the current administration, is not the friendlier version we’ve gotten used to seeing in recent years.  They have declared war both on taxpayers and preparers.  They seem to think that everyone is trying to cheat.  Many agents assume guilt until proven innocent instead of the other way around.

So you don’t want to give them any more information than they require.  It can lead to seemingly innocent questions that are designed to confuse and illicit more information.  Sometimes it can be difficult to answer these leading questions without incriminating yourself.  This holds true even if you have nothing to hide. This process only leads to more questions and lots of stress.  If you are being represented by someone, this can also lead to many more hours of time that you’ll be billed for.

To avoid this problem, it is best to just leave your personal finances out of the picture altogether.  Always have a separate checking account for your business.  Don’t write checks for personal expenses out of your business account.  Instead write a check for a withdrawal and deposit that to your personal account.  This advice goes for electronic transactions too. 

In this way, under most circumstances, your personal life will be well out of the view of the IRS or any state auditors as well.  Depending on the type of audit you have, you may still have to produce personal records.  However, this is unusual in most audits. 

There are some other reasons this separation is a good idea.   You will save yourself so much money on tax preparation if you keep your personal stuff out of the picture.

When personal expenses are included in business records, some almost always end up under the business categories instead of in draws or distributions where they belong.  Conversely, sometimes business expenses end up in draws.  This is due to lack of accounting knowledge or may just be an honest mistake.  Either way, it will be easier to correct your records if personal expense are not there to begin with.

Your tax preparer, because he or she is practicing due diligence, will look at everything in your accounting file.  This is because there are almost always misclassified items, whether in your favor or not.  Your preparer wants you to pay the least legal tax possible while also protecting you from doing things wrong.   

If your accounting file is twice as big because of personal expenses, that’s a lot of extra stuff to look at.  I have prepared returns that have cost clients hundreds or even thousands extra because I had to wade through accounts that contain so much personal stuff.  This is really a sad and unnecessary waste of money that is so easy to avoid.

The other thing to consider is how much of your personal life do you want to make public.  Again, we are all human and it’s hard to forget something once we’ve seen it.

I once had a client that bought all kinds of lingerie and other paraphernalia for his wife through his business account.  At least, I hope it was for his wife!  I won’t go into any details here, but I will say that it was kind of embarrassing. This kind of thing does not belong on public display, so it should be left in your personal records.

In summary, while it is legally permissible in some circumstance to pay personal expenses from business, it is not recommended.  You will have much better protection as well as pay much lower professional fees if you just keep personal expense to your personal account.

If you enjoyed this article or have something to add, please feel free to comment.  I always enjoy hearing from my readers.  Also, please click the like button in the Facebook box in the left margin.  Thanks for visiting!


About Robert Seth

Robert Seth is a CPA in the Clark County, Washington area who has been serving individual and small business clients for the last 25 years. His business includes a growing number of remotely serviced customers throughout the United States. He’s also a writer and technology expert. He has a passion for improving the lives of others by helping them simplify the complicated stuff in their lives.

How to Choose a Web Host – Part 2

Data Center PictureThis is Part 2 of How to Choose a Web Host.  For Part 1, please click here.

What Is Their Definition of a Short Down Time?

I never would have dreamed of asking this question until I went through a lengthy down time with Midphase.  In fact, this is what caused me to finally toss in the towel with Midphase and find a new host.  It was early one morning and I was trying to work on my site.  I couldn’t get my dashboard to come up and quickly realized the site would not come up either. 

When I called Midphase they were not even aware the site was down.  In case you’re new to this, that’s what shared, managed hosting is all about.  THEY are supposed to manage the server, not you.  If your site goes down, they should have it fixed so fast that most of the time you won’t even know it was down.

When a site does go down it’s customary to have it back up quickly.  Quickly means between 5 and 30 minutes, or an hour tops.  It took Midphase over 24 hours to get my site back up. 

If you do the math, this completely blows their 99.9% uptime guarantee out of the water.  To be up for 99.9% of the time for a month, you could not be down longer than about 1.44 minutes or 86.4 seconds!  So clearly I was a bit concerned. 

When I interviewed Hostgator to see if I wanted their hosting, I asked them about this with a deliberately very open ended question.  They said what I just told you; a short time is between 5 and 30 minutes.  Any longer and they’d be looking at restoring their backup of your site to a different server. 

What Features Do They Offer?

Now we come to some of the more objective issues involved in selecting a host.  You’ll want to know how many domains they will allow you to host.  It’s not that important that their least expensive plan allow multiple domains.  Just so long as you can upgrade later. 

If you’re planning on using WordPress for your website, you might want to check if they offer the one-button installation.  Otherwise you’ll have a bit more work as you’ll need to upload WordPress to your site and install it manually.

One nice extra that Hostgator offers is they will transfer your entire website from somewhere else free of charge.  You will have some supervision to do, but they will transfer all the content. 

You might want to check into a dedicated IP address for your site.  This is becoming a less common offering as we are starting to run a little short of unique IP addresses on a worldwide basis.  When I signed up with Midphase years ago, they just gave you one if you wanted it.  Now, when I signed up with Hostgator, they would only give me one if I bought a business plan and installed an SSL certificate.

There are a multitude of other features that web hosts offer so be sure and do a detailed comparison of the ones that are important to you. 

In the first part of this article, I told you I’d give you an example of why price might not be such an important factor in your decision.  Let me give you that example now. 

The difference in price between Midphase and Hostgator ended up only being about a dollar a month.  Keep in mind that making this comparison was rather involved because each included different things in their plans and charged extra for other things.  However, in the end, it was only a dollar difference. 

Now think about some of the less objective features I mentioned in the first half.  The two that come to mind for me are the definition of down time and the ease of use of each one.  For a dollar a month more, I get a host that actually pays attention to when my site goes down and has it back up 23 ½ hours faster than the other.

I also get a host where everything can be done from one place instead of searching everywhere and having to do many things during their “regular” business hours.  Transferring my old site free of charge didn’t hurt the decision process any either.  There are a few other things that are better too, but these are the main ones.

Negotiating Price

As I said before, price should not be a big factor in your decision process.  That being said however, sometimes there’s quite a bit you can do to save some money once you select who you’d like to go with. 

Something many people don’t know is that you can significantly reduce your monthly cost by paying for more time in advance.  Usually you can pay for up to three years which results in significant savings. 

Many hosting companies also have ongoing discounts.  These discounts can be quite random and even the employees of the hosting company may not know when the next discount is going to happen.   They will usually know what the maximum discount is though so you can check back every few days to see what that day’s discount is.  When it reaches the level you want, than purchase your service. 

These discounts will normally apply to your first order.  If you pay for three years up front, that’s considered your first order.  I think I saved over $100 with Hostgater by doing this. 

Another thing hosts will do sometimes is price match.  At one point I was thinking about leaving Midphase (I wish I would have at that point) and I had gotten a dirt cheap quote from GoDaddy.  I told Midphase about it and they matched it.  The funny thing is, the price from GoDaddy was negotiated too so the ending price was pretty low.

Another thing to keep in mind is that even if you pay several years up front, you are not usually locked in.  Every host I have come across will refund your unused months should you decide to go someplace else.  So unless you are just strapped for cash and can’t afford the longer contract, it’s always best to pay as much up front as you can.  If you use a host I haven’t mentioned in this article though, be sure to ask about their policy and not just assume their refund policy is the same. 

Other Considerations

There is one other little piece of advice I’m going to throw in here for free.  This really has little to do with choosing a hosting company but is very important all the same. 

While it will be tempting to register your domain name with the same company you host with, this practice should be avoided. 

When both are in the same place, one company has control over your entire online operation.  This is usually a problem when your hosting company decides you have done something they don’t like or they consider unethical.  Even if you were not responsible, they may lock down your site and make it unusable.  If your domain is registered with them too, there will be little you can do until they consider the problem resolved. 

However, if your domain is registered elsewhere, and you’ve backed up your site, you can quickly move it someplace else and resume operations.  This can be a lifesaver if you make a significant amount of your income online. 

There are many, many other things people consider in their decision about which hosting company to use.  For example, my friend Amity of www.GreenGiftsGuide.com left a comment on the first part of this article.  She said that she found a host that used renewable energy to power their operation.  I find that totally cool, but I never would have thought of it without her comment. 

This article covers the basics that you should look at.  I’m sure you’ll be able to think up other consideration based on things that are important to you.  Whatever those things are that are special and important to you, be sure and ask your prospective host about them.  If it’s important to you, surely it’s important to others too and someone has worked it into their operation.  There are enough hosts out there that everyone should be able to find one that works for them. 

If you enjoyed this article, please leave a comment.  I would love to hear what other considerations you may have in finding just the right host.  Also, please click the like button in the “Find us on Facebook” box in the upper left. 

If you would like to receive notification of new articles and our free newsletter, fill in the box at the upper right or click here.  You will also receive our free video e-course on how to tune up your computer and keep it that way.  It will save you tons of time starting up your computer as well as while running programs.  It’s the same process the pros use and charge lots of money for.  You’ll get it completely free though and you can even share it with your friends.  Then YOU can be the expert!

Thanks for Visiting!


About Robert Seth

Robert Seth is a CPA in the Clark County, Washington area who has been serving individual and small business clients for the last 25 years. His business includes a growing number of remotely serviced customers throughout the United States. He’s also a writer and technology expert. He has a passion for improving the lives of others by helping them simplify the complicated stuff in their lives.

How to Choose a Web Host – Part 1

Data Center PictureWhen selecting a company to host your website, it’s important to get it right the first time.  A little extra work in the beginning can prevent tremendous headaches later. 

I thought this was a good time to write about this topic as it’s very fresh on my mind.  I have gone through two changes of hosting company in the last four months.  Both changes were very different from each other and for different reasons. 

The first change came about in May when I wanted to transfer my site away from the company that is used for participants in the Ultimate Internet Boot Camp (UIBC).  This boot camp is an amazing five day course but leaves you with a site that is rather limited in what you can do with it. 

Since they only allow the installation of about 12 plugin, the functionality of the site kind of suffers.  The worst part however, is that you cannot install a backup plugin.  This not only has the obvious drawback of no backup, but it makes it very difficult to transfer your site to somewhere else should you so desire.  Their fees were also very high compared to everyone else.

So I moved the site to a host I’d been using for another site.  This host’s name is Midphase and I’ve been with them for around 10 years.  What made me choose them was their excellent customer service, low price, and the fact that I’d already been with them so long.  I soon learned though, that none of these reasons, by themselves, is a good reason to choose a particular host.   

When I transferred my site again four months later, I went to Hostgator.  By the time I did this I had lots more experience and had a much better idea of how to make a good selection.  Hostgater comes highly recommended and so far I have not been able to find any problems (or even concerns) with them. 

If you know me personally, you know that I ask a LOT of questions!  People that don’t know me can mistake this for just trying to cause trouble.  People that do know me love this, and count on it when they need information about something. 

Picking a hosting company was one of those issues that I turned the massive question mark to.  I’m sure many a customer service person was tired of talking to me when it was over.  However, now you get the benefit of knowing what questions to ask and what kinds of things to look for in a hosting company. 

Ok, now I’ll stop blabbing about how this all happened and give you some information you can sink your teeth into.

Cost of Hosting

You may find this next statement kind of odd, but, cost should not be a major factor in your decision process.  Most hosting is very competitively priced.  As long as the package you’re looking at is within a reasonable range (between $6 and $12 per month) DO NOT compare price until you are absolutely certain all other features are equal.  I’ll give you an example in a moment to show you why price is not a good measuring tool for this.

How Many Customers Do They Have?

Web host come in a huge range of sizes.  There are local ones with just a couple hundred customers, all the way up to ones with millions of customers.  My preference is for one somewhere in the middle. 

If you pick a host that’s too small, they have problems related to inadequate revenue. It will be difficult to make upgrades to stay cutting edge.  It will also be difficult to keep enough staff on hand to deal with unexpected problems. 

While it’s probably better to pick one that’s too large over one that’s too small, large ones have their problems too.  They can tend to lose their sense of how important each customer is.  They also can make arbitrary rules that are not necessarily in the best interest of the customer.  A good size range seems to be between one and five million customers.  This allows for adequate operating revenue while still maintaining that sense of customer appreciation.

How Long Have They Been In Business?

You can learn a lot more than you might think with this question.  Obviously this answer will tell you if they’ve been around for a long time or if they’re just a startup that might not be there next year. 

However, when you combine the answer to this question with that of how many customers they have, you start to get a much more complete story.  Let me explain.

Midphase has been around for around 15 years.  Yet they only have about 20,000 customers.  This fact alone should really bring some serious questions to your mind.  Especially when you consider that Hostgator has been in business a much shorter time but has over 1.5 million customers.  Bluehost which has been in business a similar amount of time as Hostgator has 5 million customers.  And GoDaddy, which has been around less time than any of these, has many millions of customers. 

So why would Midphase have so few customers after so much time?  This is a difficult question to answer without a lot of research.  However, it becomes painfully obvious when you try to move your site.

It turns out they are a hodgepodge of little companies and sites.  There is no one place where you can manage everything like with most hosts that have grown quickly.  You have to go one place to manage you domains, another to manage your name servers, and still another to manage your site.  There is little that’s automatic about them and much that has to go through the “billing department” during regular business hours. 

My friend Rose Mis helped me with this transfer and we both felt that we had never seen anything like the complications, loose ends, and unrelated details that had to be dealt with in this transfer. 

So when you hear that a host has been in business forever, but only has a few customers, dig deeper and make sure you listen to all those warning bells going off in your head.

What Interface Do They Use?

The interface I’m talking about here is the one between you and the back end of your website.  The overwhelming majority of hosts use CPanel.  If you don’t already know how to use it, it’s easy to learn.  It’s also known by virtually every tech person you’d want to hire to help you. 

Some hosts, like GoDaddy, have their own proprietary interface.  If you’re used to CPanel, you’ll have a learning curve if you sign up with someone that doesn’t use it.  Also, if you plan to use a host that does not use CPanel, make sure anyone you plan to hire to help with your site knows the interface you’re planning on using.

I actually briefly signed on with GoDaddy before I went to Hostgator.  I did not transfer my site but I did set up a new one just to see how it would go.  Between the constant technical issues and the foreign-feeling interface, I quickly decided this was not the direction I wanted to go.

Other Consideration

There are several other things to be considered when choosing a web host.  We’ll look at those in part 2 of this article which you can read by clicking here.

If you enjoyed this article, click the like button in the “Find us on Facebook” box at the upper left. If you would like other tips on using your computer, and keeping it running in top shape, click here to receive your free online video course.  It will show you how to get your computer running in top shape (just like the pros do) and keep it that way.  You can even share it with your friends and help them make their computers better too!

Thanks for visiting!


About Robert Seth

Robert Seth is a CPA in the Clark County, Washington area who has been serving individual and small business clients for the last 25 years. His business includes a growing number of remotely serviced customers throughout the United States. He’s also a writer and technology expert. He has a passion for improving the lives of others by helping them simplify the complicated stuff in their lives.

How to Add or Remove Plugins From Your WordPress Website

If you’re new to WordPress, or even if you’re not, knowing about plug-ins is a must.  WordPress is an amazingly powerful and simple platform.  It can make you a web pro in no time even without installing any extra plugins.  But to really shine and get your WordPress site performing at its best, you’ll eventually need to know about plugins. 

The basic purpose of a plugin is to extend the capabilities of your site.  They can also greatly simplify something that would be very difficult to do otherwise.  For example, let’s say you want to add a contact page to your WordPress site.  With a plugin, it’s as simple as clicking on install and the job is done.  If you had to do that with HTML or PHP programming it would take you much, much longer.  That’s assuming of course that you even knew how.

Since most of us don’t know how, plugins are a tremendous help.  They make it so we can concentrate on writing great content, or doing whatever we do best, rather than learning to be a programmer.

Since the purpose of this article is not to tell you about all the plugins that are available I won’t go into any detail about that.  I will say however, that there are thousands of them to choose from.  This is very fortunate for anyone that wants to use WordPress as their blogging or web platform. 

Not only are there thousands to choose from, but there are many of each type.  This is also of great benefit to us.  Sometimes one plugin may not play well with everything else we’ve got going on with our WordPress site.  A good example of this is the post editor I use on this site. 

I began with a plugin called Dean’s FCKEditor.  It is a full-featured and very good editor and many people use it without any problem.  On my site however, it behaved very erratically.  It even caused me to have two of the same input windows right on top of each other.  This was definitely not how the software was supposed to work.

So, since I was familiar with another editor plugin called TinyMCE Advanced, I thought I’d give that a try.  It worked perfectly.  This is not to say that Dean’s FCK is a bad editor at all.  I just tell you this to provide an example of why it’s a good thing that we have so many to choose from.   It makes it so you can choose your set of plugins that will make your WordPress site hum along beautifully.

Now that you know what plugins are and why you need them, let’s talk about how to install and delete them.   Go to your WordPress dashboard and look at the menu items down the left side.  Find the Plugins category and click on Add New as shown in the screen shot below.

(Click on screenshots to enlarge and open in new window for better viewing)

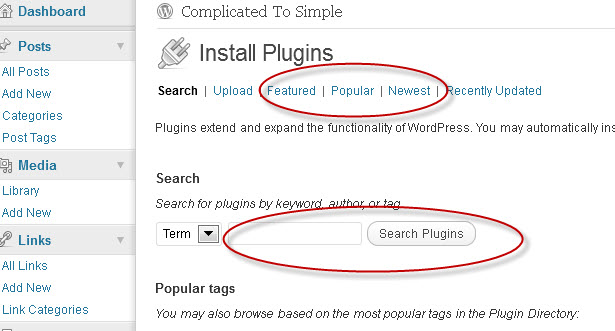
The Install Plugins screen will come up next as shown in the next screen shot. 

In this window you have several choices.  You can either click on one of the choices circled above or you can do a search.  Clicking on Popular brought up the following screen for me.  What comes up for you will depend on what’s popular at the time you do this.  If you want to search, you can either enter a term, or leave the box blank.  Leaving it blank will bring up all plugins.  Entering a term will narrow your search considerably.

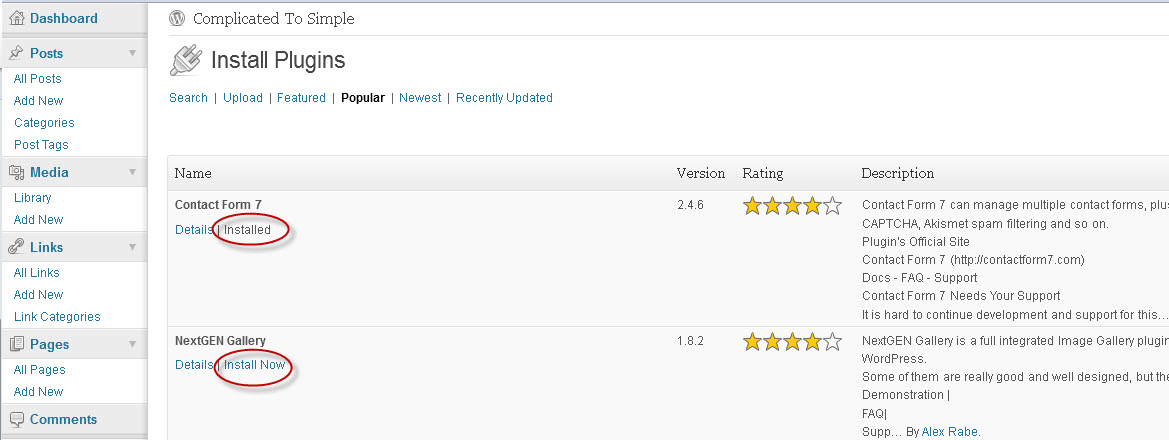
Notice that the page already knows what’s installed.  So for me, since Contact form 7 is already installed, it says so. 

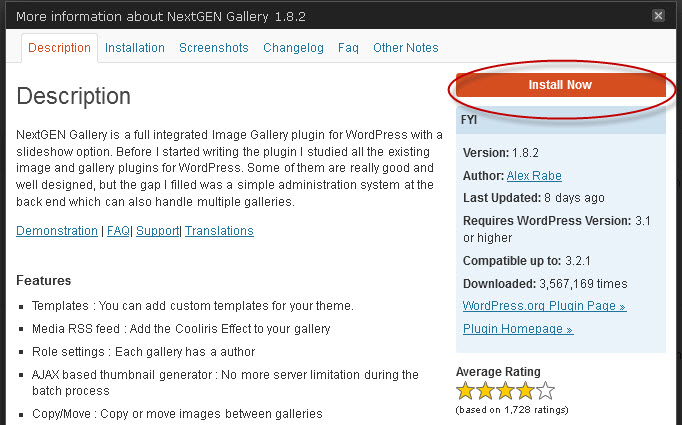
In this case, NextGEN Gallery is not installed.  If you click on Install Now, it will do just that.  It will ask if you’re sure and if you click yes, the installation will be instant. 

Clicking on details will give you a chance to read about it and make sure it’s what you want as shown in the screen shot below. 

Clicking on Install Now will do the same as on the previous screen.

Once you install, you get the following screen.  Click on Activate Plugin to activate it and make it usable.  This is a good place to mention something else.  You do not need to activate plug-ins that are installed on your site.  You can also deactivate (which I’ll show you in a moment) a plug-in that you don’t want to use. 

There are many reasons for not activating every plugin.  You may want to test several plugins to see which one you like.  Maybe one stops working but you think the next WordPress update might fix it.  Deactivating makes it so you don’t have to download and install again in the event you want to reactivate.  I still have Dean’s FCKEditor installed on mine.  I’m hoping someday it will work again with my setup.  If I delete the plugin rather than just deactivating, I’d need to download and install it again. 

Some plugins require you to adjust settings once activation is complete.  There are far too many to discuss in this article.  I just want you to be aware that it’s normal to have to do this. 

Once your plugin is installed and activated, it will look like this in your plugin list.  To edit the settings, click Edit.  To deactivate, click DeactivateDelete will only appear for plugins that are not active because they need to be deactivated before deleting.

To finish up let’s show you what deactivating and deleting looks like.  Click on Deactivate and now the plugin looks like this. 

You may also see the following screen shot at the top of the screen depending on what other plugins you have installed. If you do see it, be sure to follow the instructions.

If you want to delete, click the Delete button that now shows up.  The following screen appears.  The system gives you plenty of chances to change your mind or to get additional information.  If you want to see what exactly will be deleted, click on the Click to view entire list of files which will be deleted option at the bottom of the screenshot.

Click on Yes, Delete these files and data.  The plugin will be deleted and you will see any appropriate messages at the top of the screen.  As before, be sure to follow any instructions given there. 

So there you have it.  That’s the basics of installing and deleting plugins on your WordPress Website. 

One other thing I should mention here.  Some types of WordPress installations do not allow you to change the plugin or they only allow you to select from a few.  My first website was like this.  I took a course called the Ultimate Internet Boot Camp.  During that course, we actually installed and set up our WordPress websites and did our first blog post. 

The course was great, but I soon learned some things that I didn’t think were so great.  You only had a choice between a few plugins.  Most of the ones that were installed were done in such a way that you couldn’t even see what they were and they could not be removed. One of the worst parts to me was that you could not even install a backup plugin so you could back up your site. 

I believe the reason they did this was so you couldn’t back it up and install it someplace else.  They did not want to lose their rather inflated hosting fee.  To get my site off their servers and onto someplace else was quite a job.  It required copying and pasting every piece of information on my site to another site.  It was really worth it though.  Now I have all the freedom WordPress has to offer without any artificial restrictions. 

If you are taking a course like that and you want ultimate control over what you do with your site, I would recommend getting off their servers as fast as possible.  The longer you wait the more information you will have to move.

If you enjoyed this article and it was useful to you, please leave a comment below.  If you like the site, please consider clicking the “like” button in the “Find us on Facebook” box in the left sidebar.

Thanks for visiting!   


About Robert Seth

Robert Seth is a CPA in the Clark County, Washington area who has been serving individual and small business clients for the last 25 years. His business includes a growing number of remotely serviced customers throughout the United States. He’s also a writer and technology expert. He has a passion for improving the lives of others by helping them simplify the complicated stuff in their lives.


How to Add Videos, Photos, and Images to Your WordPress Website

Blogging with just written content can be very engaging to your readers and a great way to keep the conversation going.  There’s nothing like photos or video, though, to really bring the conversation to a new level.  Here’s how you put photos and videos on your WordPress Website.

This article will also be applicable to many other types of websites too.  Many website interfaces are very similar and use the same methods, or very similar ones to achieve the same tasks.  Hopefully, with some  slight modifications, you will be able to apply this information to your non-WordPress website too.

Before you can upload a video or photo to your website, it will need to be in an acceptable format.  Although this is really the subject of another article, let me take a moment to explain this.  Many video and photo cameras use proprietary formats for their videos and photos.   The RAW format that many high-end cameras can shoot in is an example of this.

Before these photos or videos can be used, they must be converted to a standard format that your website will understand and will be able to load quickly.  The most commonly supported formats for web photos and images are JPG, PNG, and GIFF.  You can tell if your image is in one of these formats by looking at the extension, or last three letters, in the file name.

For example, if I have a file named  myphoto  in JPEG format, it would look like myphoto.jpg.  Most modern digital cameras have shooting modes that will create this type of file in the first place.  This prevents having to do any conversions.

The standard formats for web video files are WMV, MOV, FLV, MPEG, and MPEG-4.  Again, it is best to get your video into one of these formats before attempting to upload it.

After you have your photo or video in an appropriate format, now it’s time to get it online.  There are basically two methods for doing this.  Which one you use depends on a couple of different factors.

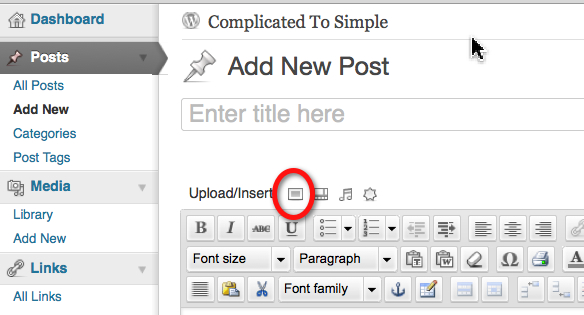
First, let’s look at photos or images.  Since these should be of fairly small size, they’re ok to put on your own website.  To do this, open up the dashboard for your WordPress website as shown below.

The image uploader is circled in the screen shot above.  Click on this and the Media Library will open as shown below.


Click on Browse, find the file on your computer, and click on the file.  It will be added to the box next to browse in this screen shot.  Next click on Upload.

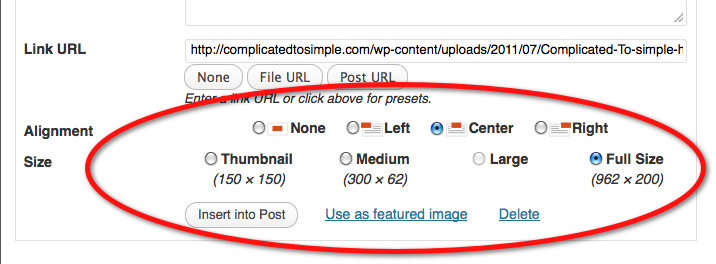
This screen shot is just the bottom portion of the screen that appears next.  Select the alignment and image size and then click on insert into post.  The image will be inserted wherever your cursor is on the post entry screen.  The size can also be adjusted by dragging the boundaries of the image once inserted into the post.

For inserting videos, there are two choices.  You can either put them on your site or host them on a site like YouTube or Vimeo.  It is generally not recommended to host videos on your WordPress site.  This is because the bandwidth of your site’s host could easily be exceeded if you have lots of visitors viewing your video at the same time.

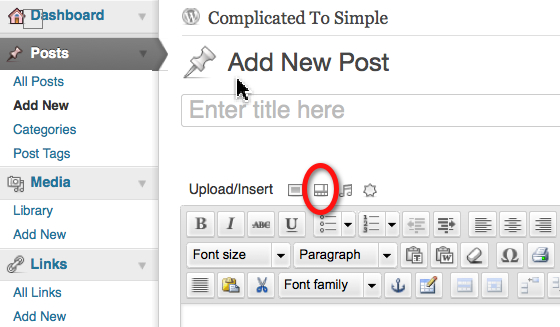
If you do choose to host them on your site you will be limited to two megabytes.  To upload a video, you would use exactly the same process as for images with one exception.

Refer to the circled portion of the screen shot above.  That is the video uploader.  Simply click on that and proceed in the same way as you did for images.

For hosting videos on Vimeo or YouTube I will not go into how to get them on those sites in this article.  That will be the subject of future articles.  For now, you can go to either of those sites for instructions on how to use their sites.

For purposes of this article, we will look at how to get a YouTube video onto your site.  Most other video hosting sites will use a similar process.

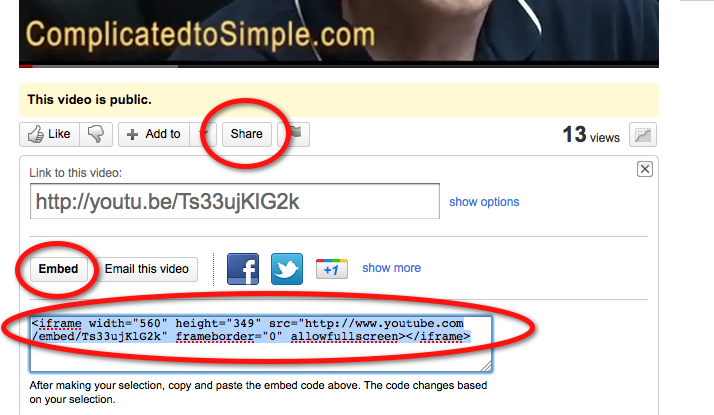
Once you have your video on YouTube, go to the actual video and click on it as if you were going to view it.  The panel below the video, as shown in the screen shot above will appear.  Actually, only the part above Link to this video will show up at first.  Click on Share, and Embed, and the remaining part of the screen will appear.

If you just want to send your viewer to YouTube from your site, copy and paste the link in the Link to this video box.  If you want to embed the video in your site so the viewer stays on your site while viewing, copy and paste the code in the box below the Embed button.

Go back to your WordPress post that you’re working on as shown below.

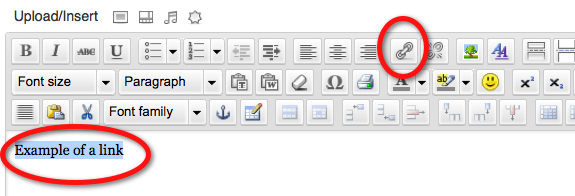
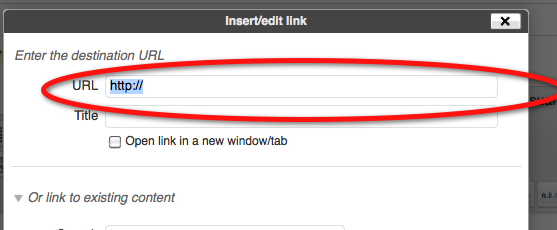
If you just want to link to the video and send your viewers off to YouTube, Type in some text that you want to use as the link.  In this case I have used “Example of a link.”  Highlight it and click on the link button as shown above.  The hyperlink screen will open and you can then paste in the code that you copied off of YouTube from the Link to the video box.  It goes in the circled box as shown in the screen shot below

If you want to embed the video, which is recommended so viewers stay on your WordPress site, do the following.

WordPress icon bar

Click on the HTML tab.  This will show you the HTML of your post instead of the visual view.  Place your cursor where you want the video to show up.  I know the HTML looks a little alien but look carefully and you should be able to tell where you want the video to appear.  For simplicity, you might just want to insert it in the post before adding any text and leave it at the top of the post.  To insert it, paste the embed code you copied from the YouTube embed box.

Be sure to save anything you do in the HTML editor before going back to the visual editor.  On many platforms, if you don’t do this, your changes will be lost when you go back to the visual editor.  Even if you’re just adding HTML tags to adjust the positioning, be sure to save first before going back to visual.  Do this by clicking Save Draft, Publish, or Update.

When you go back to the visual tab, the video will appear as a blank box.  This is how it should look.   The video will appear normal when the post is viewed by your visitors.

So there you have it.  As you can see, it’s pretty easy to add images, photos, and video to your WordPress website.  Your viewers will appreciate having some video and pictures to look at instead of just text.

So now it’s your turn.  How did you like this article?  Are there other subjects you’d like to read about?  If so, leave a comment.  We’d love to hear from you!  Also, feel free to join us on Facebook by clicking the “like” button in the “Find us on Facebook box” in the left sidebar

Thanks for visiting.


About Robert Seth

Robert Seth is a CPA in the Clark County, Washington area who has been serving individual and small business clients for the last 25 years. His business includes a growing number of remotely serviced customers throughout the United States. He’s also a writer and technology expert. He has a passion for improving the lives of others by helping them simplify the complicated stuff in their lives.


A Step-By-Step Action Plan For Writing an eBook


When writing an eBook, or anything else, it helps to have an actionable checklist to keep you on track.

Recently, after finishing my eBook about how to create an eBook, I received some interesting feedback. 

Let me explain.  This whole process started a few months ago when I decided to write an eBook to help writers with creating an eBook.  It was intended to simplify the often very complicated technical aspects of the process.  What I came up with was a tool that literally removed every technical barrier to eBook creation.  It was so simple that even a complete computer newbie could do it. 

After the eBook was finished, I was curious if there were any other kinds of barriers people experience.   So I presented that question to an internet business coaching group of which I’m a member.  This was a perfect group to ask for feedback because most were interested in writing eBooks and many had already purchased my eBook. 

The feedback I received was quite surprising.  When I began this effort to simplify the writing of eBooks for people, I assumed that most of the barriers were technical.  After all, those were the types of questions I was usually asked.  Nobody ever mentioned any other barriers.  Interestingly, it was not until the technical barriers were removed that the other barriers emerged. 

It was kind of like peeling back the layers of an onion.  Each type of barrier was like one layer of the onion.  As one was peeled back, another would emerge.  Each layer was independent of the others and it was very difficult to see more than one layer at a time. 

In addition to the technical, these writers struggled with two other types of barriers.  Emotional barriers such as self-doubt and inadequacy as a writer were one type.  Another was not having a plan which caused great difficulty in knowing where to begin. 

Let me tell you, after going through all this, it was no longer a mystery to me why so many people fail to realize their dreams of becoming a writer!  These people have so much to offer the world.  It is very unfortunate that these barriers may be responsible for us never seeing much of the work these talented writers could have produced.   It’s equally unfortunate that these writers may never be fulfilled by realizing their dreams.  

It seems I had stumbled upon a much bigger problem than I had originally intended to solve.  So with all this in mind, I decided to add to the simplification process I had already started. 

I began by writing a supplemental report that would help writers get over the emotional barriers.  This report is available for free from this website.  If you would like to read it, just fill in the box at the top of the right sidebar next to this article.  It will be sent to your email immediately. 

My next step in the solution is this article you’re reading now.  In order to get started, it’s important to have a plan.  That way important mental energy is not wasted on constantly trying to figure out what to do next. 

So here is your actionable, step-by-step process to get your amazing eBook out to the world!

Decide What You’re Going to Write About

That statement may seem obvious, but let me explain.  It is important to determine the purpose and scope of your eBook right from the start. 

Without definite boundaries, your subject matter will tend to wander.   It will seem to you like your eBook will never end because there will be no end to what you could add.  You will also frustrate your readers as they try to follow the aimless wanderings that will naturally result.

At first, define you subject tightly.  Decide on your general subject and what sub-categories you will write about.  Making a list or an outline can help with this.  As you write, refer back to this list.  Make sure everything you write fits under the categories of the list. 

Be ruthless about this.  If something doesn’t fit, strike it!   Even if whatever you just wrote was amazing.  If you don’t want to lose it, you can always save it to a snippet file.  But remove it from the current project.

Do Your Research

There are no hard and fast rules for this.  The amount of research to do before you begin is a subjective thing.  It depends on your writing style and your brand of barriers. 

What’s important is to make sure it does not become a barrier!  You need to do enough research to know your subject.  It’s also good to know you’ve generally covered your bases and haven’t left out anything important. 

It is not necessary to know every tiny little detail before you start. 

Check Your Toolbox

Make sure you have the proper tools and they’re in good working order.  This is necessary for any craftsman.  If a carpenter’s tools are broken, dull, or he doesn’t have the right ones, he will not be successful.  The same is true for writers.

Check your software to be sure you have all the programs you need to complete the project.  Be sure your software has all the features you need.   Make sure all your software works on your computer.  Be sure all updates are installed on your computer.  This includes hardware driver updates as well as application program updates. 

It is very frustrating to begin a writing project and be constantly plagued by technical interruptions.  If there are enough of them, it can completely derail your creativity.  Be sure your tools are in good working order before you begin.

Remove Environmental Barriers

Just like inadequate tools, environmental barriers can stifle the creative process too.  Make sure you have a quiet place to write without interruption or distraction.  Turn off your email program and your telephone. 

If you have children or other responsibilities, try to pick a time when you are least likely to be interrupted.  If necessary, hire a babysitter and go to the library.  If you have a favorite place like the beach or a park, these places can contribute greatly to a proper writing mood. 

Make sure you are comfortable.  Proper clothing, furniture, nutrition, hydration, and sleep will all contribute to success in this area. 

Start Writing!

This is another subjective area of writing.  Some writers stick closely to an outline while others just start anywhere. 

The important thing is that you start!  This seems to be a sticking point for lots of writers.  It shouldn’t be.  It doesn’t matter where you start.  Just begin writing and it will become easier as you go. 

Just remember that you only need to actually start once.  So the sooner you do it, the sooner you can move on.

 Wrap It Up

The category has a dual meaning.  First, wrap it up as in finish it up.  Finish writing and check your spelling and grammar.  It’s a good idea to have some help with this as it’s very difficult to edit your own work.  Make sure you have included everything you intended.  Also make sure you didn’t include anything outside your scope. 

Secondly, decide on what kind of wrapping you want.  This includes things like page and page number styling as well as cover design.  You can do this yourself or outsource the task. 

Publish

The steps involved in publishing will depend on how you intend to distribute your eBook.  Just emailing your eBook requires very different steps than hosting, distributing and selling it online.  If emailing, you will mainly just need to convert your eBook to electronic format and secure it.  If distributing online, you will also need to get it to your website, set up a delivery method, and decide on a way for your buyers to pay for it.

Conclusion

Naturally there will be variations on the steps I have outlined here.  However, if you stick to these general guidelines your eBook journey should be fairly straightforward and painless.

I have also only included the basics of each step here.  That’s because this is just supposed to be a checklist to help you get moving in the right direction.  For more detailed help, be sure and pick up a copy of the free report I mentioned earlier in the article. 

For complete coverage of this topic, I recommend checking out my eBook as well as picking up the free report.  You can go directly to the eBook sales page by clicking here.  Just a little hint though.  The free report has a special eBook bonus at the end so you might want to read it first! 

Was this article helpful to you?  Do you have additional suggestions for our other readers?  If so, please leave a comment here or on the Complicated to Simple Facebook Page.  You can join us on Facebook by clicking the “like” button in the “Find us on Facebook” box in the left sidebar.

Thanks for visiting!


About Robert Seth

Robert Seth is a CPA in the Clark County, Washington area who has been serving individual and small business clients for the last 25 years. His business includes a growing number of remotely serviced customers throughout the United States. He’s also a writer and technology expert. He has a passion for improving the lives of others by helping them simplify the complicated stuff in their lives.


How Much to Save for Taxes in Your New Business

Image of IRS formAre you trying to figure out some of the tax issues of your new online or home business?  If so, you are a wise business owner. Failure to save for and pay taxes is one of the biggest reasons small businesses fail.

Taxes are behind so many small business failures because of the difficulty in calculating how much money to set aside for them.  In addition, the combined tax rate on sole proprietors is among the highest of any type of taxpayer.  When you combine these two facts, it becomes a recipe for tax disaster if it’s not handled correctly.

So while tax law is very complicated and I can’t teach you everything in one sitting, I can give you some basic rules that should keep you safe.

First of all, there are generally two ways that businesses are taxed.  One is as a percentage of gross sales.  The other is on net income.  Your situation will depend on what state your business is located in.

Tax on gross sales generally happens at the state level.  That means that with limited exceptions, there are no deductions against this type of tax.  So if you have $50,000 of sales in your business and the tax rate is 2%, you will need to set aside $1,000 for this tax.

Sales tax is another type of tax that occurs at the state level and is based on gross sales.  If you sell a product (services are not usually subject to this tax but check your state law to be sure) then you are required to collect sales tax and pay it to your state.  In my practice, this is the state tax that gets people in the most trouble.

It’s usually a pretty large portion of the sale price.  Since it just gets mixed in with the sales, it’s very easy to lose track of and spend.

If these sales tax dollars have been spent when it comes time to pay, the business instantly becomes in debt to the state.  Penalties and interest add up very fast and can quickly overwhelm a small business.  So find out what’s required in your state. Then be very careful to set the money aside whenever you collect any sales tax.

Taxes on net income happen at the federal and state level.  Not all states have a net income tax though so check with yours to make sure.  Net income is just your total sales less your deductible expenses. 

In the United States, taxes at the federal level are the same no matter where you live.  They can vary a great deal though, depending on what type of entity your business is.  An entity is a sole proprietorship, partnership, s-corporation, c-corporation, LLC, etc.

Since most small businesses start as sole proprietorships I will limit the discussion to them in this article.  Generally you’ll know what type of entity you are by the paperwork you filed to get your business started.

Sole proprietors are subject to two main taxes at the federal level.  The first is the all familiar federal income tax.  The second is self-employment tax which is also called social security.     Both taxes are calculated on your net income, not your gross sales.  So when calculating these taxes it’s important to know your deductions so you can make an accurate estimate.

As a general rule, everything that’s necessary (within reason) to conduct your business affairs is deductible for taxes.  This is a general rule though with lots of exceptions so your calculations will probably not be perfect until you actually prepare your taxes.  Don’t be overly concerned about this though.  This calculation is only for estimating and will not effect your actual tax liability

Let’s talk a little about some of the bigger, more common exceptions.  Probably the most common, and one the IRS likes to pick on, is entertainment and meals.  Even if there is a reasonable business purpose, these expenses are only 50% deductible.  Without a business purpose, they’re not deductible at all.

Another IRS favorite is auto expenses.  This is a complicated tax subject by itself so here’s the simple of it.  You can use actual expenses or the standard mileage rate.  Whichever you choose, you can only deduct the business portion.

If using actual expenses the business portion is calculated by multiplying all the auto expenses by the business use percent.  If using the standard mileage rate, simply multiply the business miles by the rate allowed.  In 2011 the rate is fifty cents per mile.

If you are uncertain about any business expense, it’s best to leave it out of this calculation so you don’t underestimate the amount of tax to set aside.

Now that you have an estimate of net income you can do a rough estimate of the taxes.  Self-employment tax is the easiest so let’s start with that.  The amount of this tax will simply be 15.3 percent of your net income.  For 2011 12.4% of this tax stops after you reach $106,800 of net income from your business.

The federal income tax is much more difficult because it depends on many factors.   It’s calculated on your total income minus your total deductions and personal exemptions. If you have other types of income, it’s quite difficult to know exactly how much will be due until you file your return.

So if you have a job besides your business, a working spouse, or significant other income, these estimates will be very rough.  If you are entitled to any federal tax credits this will also affect the estimate.

Always remember that your estimate for federal income tax is in addition to self-employment tax, not in place of it.

If you are single, or married and filing separately from your spouse, and your taxable income (net income less deductions and exceptions) is less than $35,000, you should set aside 15%.  Between $35,000 and $84,000 set aside approximately $5,200 plus 28% of the amount over the $35,000.Between $84,000 and $175,000 set aside approximately $19,000 plus 31% of the amount over $84,000.  If it’s more than that, it’s probably best to see your tax adviser or consult a more in-depth publication.

If married filing jointly and taxable income is less than 58,000, set aside 15%.  Between $58,000 and $140,000 set aside approximately $8,650 plus 28% of the amount over $58,000.  If $140,000 to $212,000 set aside approximately $31,600 plus 31% of the amount over $140,000.  Again, if income is more than this, you should consult your tax adviser or a more in-depth publication.

If all this seems to complicated for you, or you just don’t have time to go through this calculation, here is a much quicker method.  Just set aside 50% of everything you earn.  This will likely be far more than you need, but at least you won’t come up short.

I should probably mention one other thing here.  When calculating total income for the beginning of this calculation, it means total income. Total income means everything you earn.  Assume you are selling products from another company online and they send you your profits after deducting the cost of the product from your sales.  Your total income is not the amount they send you.  It’s the total sales dollars!

When you prepare your tax return, you will need to show this total income.  You will also show the total cost of the products as a deduction.  While the net income will be the same whichever way you do this, it’s important that the gross sales be shown correctly because of the other taxes mentioned in this article. 

Please remember that these calculations are very basic and are intended to give you only a general idea of how much money to set aside.

Finally, remember that there can be many taxes and fees you may be subject to.  Most will be much smaller than what we’ve discussed here.  Some of these types of taxes are city and county taxes, or licensing fees.  To be sure you’ve covered them all, you should contact your state agency that’s in charge of taxation or a competent tax advisor.

If you need more information or would like to see other tax and accounting issues discussed, please leave a comment and tell me what you’d like to know.

If you liked this article, please click the “like” button.  If you like the site, please click “like” in the Facebook box in the left margin.

Thanks for visiting and I hope to see you back soon!

.

HELP! What Does it Mean: Fragment (Consider Revising)?

Has your word processing program ever advised you to reconsider a sentence you just wrote?  Have you ever sat and puzzled over it in frustration, wondering what it was so upset about?

Maybe your sentence wasn’t really a sentence, after all.  But how can you tell?  What sets apart a real, honest-to-goodness sentence from a phrase or a fragment?

Well, you came to the right place for a simple, no-nonsense explanation.

Every sentence must have a subject, as well as a verb which tells what the subject is doing or being.  It must express a complete thought, however brief.  If you don’t have those ingredients, then you don’t have a sentence.

“Noun” is the technical term for words that name something, most often a person, a place, or a thing.  For example, “woman,” “lake,” and “car” are all nouns.  “Woman” is the English name for a female human, while “lake” names a medium-sized body of non-flowing water and “car” names a type of vehicle.  Other, less tangible things can also be nouns, such as emotions or ideas.

Every sentence must be about something or, to put it another way, it must have a subject.  That subject has to be a noun.  For example, take the sentence “The ball is green.”  This sentence is about a ball.  “Ball” is a name (noun) for a round object.  While “green” is also a name (noun), it is not what the sentence is about so it cannot function as the subject of this sentence.  Of course, it certainly could form the subject of a different sentence, such as “Green is my favorite color.”

So, to have a sentence, there must be a naming word (noun) that lets the reader know what the sentence is about.

Just sticking in a noun doesn’t make a string of words into a sentence, no matter how long the string of words becomes.  “Is green” doesn’t become a sentence even though it contains the noun “green,” because it doesn’t tell you what is green.  Clearly, this is a fragmentary thought, and that’s why such phrases are labeled “fragments.”  Nor does it help to pile on more words.  “Is lovely, pale, luminescent lime green” does not magically transform this into a sentence.  There is still no clue as to what it’s talking about.

I’ll throw in one other tidbit about nouns, just for free, though it has nothing to do with determining whether or not you have a complete sentence as opposed to a fragment.  But I find that people frequently have trouble with this next concept.

There are common nouns and proper nouns.  Common nouns are, as might be expected, ordinary naming words, usually somewhat generic.  All my sentence examples above use generic, common nouns:  woman, lake, car, ball, green.  They can refer, at least potentially, to any woman, any lake, any car.

Proper nouns, on the other hand, are the specific names given to only one thing.  Not just any woman, but one specific woman:  Hilary Clinton, for example.  Not just any lake, but the one named Lake Tahoe.  Not just any car, but your neighbor’s new Camaro.

Notice that proper nouns always get capitalized, while common nouns do not.  Usually this is fairly obvious, but once in awhile it can get tricky.  For instance, “mother” is a common noun because it can potentially be naming anybody’s mom.  But if you start talking about your own mom and using the word in the sense that it’s the name you call her, then the word magically transforms into the proper noun “Mother,” because now it’s the specific name of one specific person.  Note that this only happens if you start using it as if it was her name.  If you say, “I went to town with my mother,” you’re describing who she is (my mother) rather than naming her (Mom).

Okay, so there must be a subject in every sentence, a naming word (noun) that lets the reader know what or who the sentence is about.  Let’s go on to the other essential ingredient of a sentence:  the verb.

Verbs are action words or words that describe a state of being.  Verbs tell what the subject is doing or being.  Again, there could potentially be several verbs in a sentence, but there has to be at least one that tells about the subject.

In our sample sentence, “The ball is green,” we’ve already established that it’s talking about the ball.  That’s the subject.  Now, there’s no action going on in the sentence, but there’s still a verb.  It’s a “state-of-being” verb, the little word “is.”    What happens if we leave it out?  “The ball green.”  Sounds like someone who can’t speak English well, like what we imagine a caveman might say, with a few grunts thrown in for good measure.

“The pitcher threw the ball” has an action verb, “threw.”  It tells what the subject (pitcher) did.

Sentences can be extremely simple, consisting of little more than a subject and a verb, and yet still convey a complete thought.  “The child ran” or “Mary ducked” or “Bob typed” are all examples of complete sentences.  Each is a complete (though certainly not elaborate) thought.  Each contains a noun that tells who or what the sentence is talking about, and each contains a verb that tells what the subject did.

There is nothing wrong with simple sentences like these, and often they are the best sort of sentence to use when you want to express quick, forceful ideas or actions.  If you use nothing else in your writing, however, it will soon become tedious.  It may also make you sound like you’re about six years old.

Most people write longer sentences, and this is where they can get confused about whether they have a true sentence or only a fragment.  Many times there is the belief that if you just add more words, your fragment will be transformed into a complete thought.  But “fragment” doesn’t mean “too short,” at least not in this case.  It means “not complete.”

Theoretically, you could write a fragment so long it took up an entire paragraph—or an entire page—without ever sticking in a subject or a verb that related to it.  This is one reason I’ve used such short sentences in my examples earlier.  “Mary ducked” is a complete sentence.  You don’t need to be wordy to be correct.  Of course, it also makes the concept of subject/verb easier to see and understand, since nearly everything else has been left out of these sentences.

Let’s finish up with a few longer examples.  “As she came out the back door, Mary ducked under the washing hanging up on the clothesline to dry in the bright sun and hot desert wind.”  Obviously, this paints a clearer picture of the situation than the simple sentence, “Mary ducked.”  But it is not any more complete, grammatically speaking.  Notice that the sentence, stripped of its descriptive verbiage, is still about Mary and what she did (duck).

“After coming home from school, ran out in the back yard and began digging frantically in the sandbox.”  After reading this, you ought to get a sense that something’s missing.  And what is missing is the subject.  Who came home, ran outside, and dug up the sandbox?  Well, we don’t know.  This makes the rest of the words fairly meaningless, as we have no idea who it’s talking about.

You have to have a subject for every sentence.  Just having nouns isn’t enough.  In the example above, “home,” “school,” “back yard,” and “sandbox” are all nouns (names of things or places), but none of them tell who or what the sentence is about.

“His fingers pounding the keyboard, Bob madly as he tried to finish his blog.”  Again, something is decidedly missing.  What did Bob (the subject of this sentence) do?  We have no idea (although we could probably guess from the context in this instance that he was typing).  In every sentence, you must have a verb that describes what the subject did.

And please note that just having a verb, or even several, will not do the trick.  In the sentence above, “pounding” and “tried” are both verbs, but neither tells specifically what Bob is doing.  Your verb has to tell something about the subject’s action, feeling, or even simply its existence.

Grammar can be a complicated subject, but most of us can get by just fine in our everyday lives with only a few simple grammar rules.  You don’t always have to write in complete sentences, but it’s helpful to know when you are and when you aren’t so you don’t end up with fragments by mistake.  Using complete sentences will make your writing more easily understandable by your readers, and since communication is the point of writing, that’s a good thing.