If you’re new to WordPress, or even if you’re not, knowing about plug-ins is a must. WordPress is an amazingly powerful and simple platform. It can make you a web pro in no time even without installing any extra plugins. But to really shine and get your WordPress site performing at its best, you’ll eventually need to know about plugins.
The basic purpose of a plugin is to extend the capabilities of your site. They can also greatly simplify something that would be very difficult to do otherwise. For example, let’s say you want to add a contact page to your WordPress site. With a plugin, it’s as simple as clicking on install and the job is done. If you had to do that with HTML or PHP programming it would take you much, much longer. That’s assuming of course that you even knew how.
Since most of us don’t know how, plugins are a tremendous help. They make it so we can concentrate on writing great content, or doing whatever we do best, rather than learning to be a programmer.
Since the purpose of this article is not to tell you about all the plugins that are available I won’t go into any detail about that. I will say however, that there are thousands of them to choose from. This is very fortunate for anyone that wants to use WordPress as their blogging or web platform.
Not only are there thousands to choose from, but there are many of each type. This is also of great benefit to us. Sometimes one plugin may not play well with everything else we’ve got going on with our WordPress site. A good example of this is the post editor I use on this site.
I began with a plugin called Dean’s FCKEditor. It is a full-featured and very good editor and many people use it without any problem. On my site however, it behaved very erratically. It even caused me to have two of the same input windows right on top of each other. This was definitely not how the software was supposed to work.
So, since I was familiar with another editor plugin called TinyMCE Advanced, I thought I’d give that a try. It worked perfectly. This is not to say that Dean’s FCK is a bad editor at all. I just tell you this to provide an example of why it’s a good thing that we have so many to choose from. It makes it so you can choose your set of plugins that will make your WordPress site hum along beautifully.
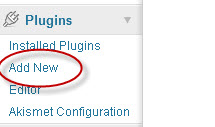
Now that you know what plugins are and why you need them, let’s talk about how to install and delete them. Go to your WordPress dashboard and look at the menu items down the left side. Find the Plugins category and click on Add New as shown in the screen shot below.
(Click on screenshots to enlarge and open in new window for better viewing)
The Install Plugins screen will come up next as shown in the next screen shot.
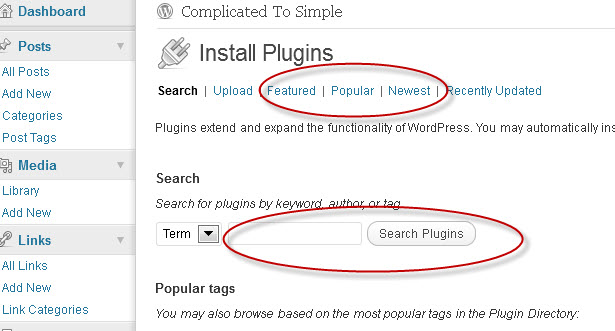 In this window you have several choices. You can either click on one of the choices circled above or you can do a search. Clicking on Popular brought up the following screen for me. What comes up for you will depend on what’s popular at the time you do this. If you want to search, you can either enter a term, or leave the box blank. Leaving it blank will bring up all plugins. Entering a term will narrow your search considerably.
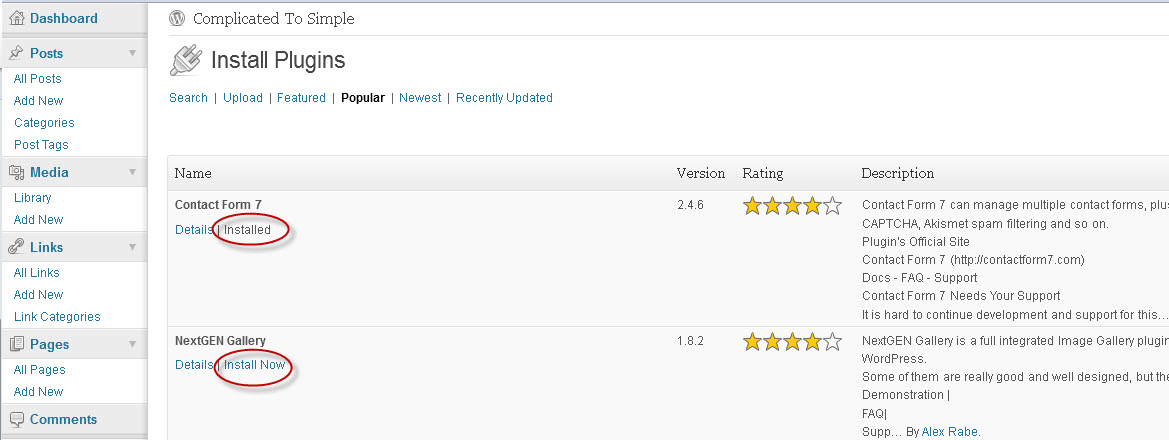 Notice that the page already knows what’s installed. So for me, since Contact form 7 is already installed, it says so.
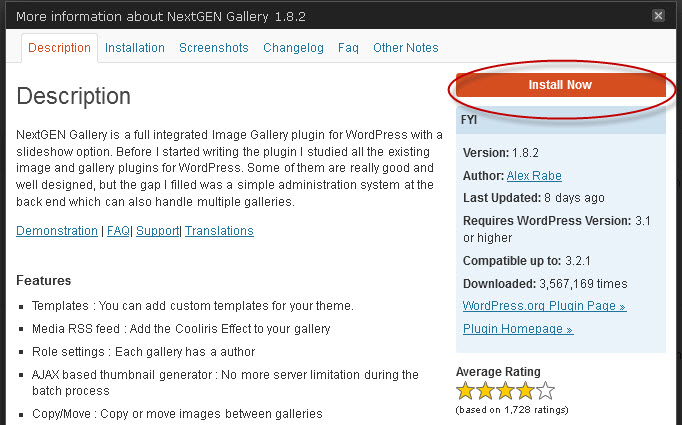
In this case, NextGEN Gallery is not installed. If you click on Install Now, it will do just that. It will ask if you’re sure and if you click yes, the installation will be instant.
Clicking on details will give you a chance to read about it and make sure it’s what you want as shown in the screen shot below.
Clicking on Install Now will do the same as on the previous screen.
Once you install, you get the following screen. Click on Activate Plugin to activate it and make it usable. This is a good place to mention something else. You do not need to activate plug-ins that are installed on your site. You can also deactivate (which I’ll show you in a moment) a plug-in that you don’t want to use.
 There are many reasons for not activating every plugin. You may want to test several plugins to see which one you like. Maybe one stops working but you think the next WordPress update might fix it. Deactivating makes it so you don’t have to download and install again in the event you want to reactivate. I still have Dean’s FCKEditor installed on mine. I’m hoping someday it will work again with my setup. If I delete the plugin rather than just deactivating, I’d need to download and install it again.
Some plugins require you to adjust settings once activation is complete. There are far too many to discuss in this article. I just want you to be aware that it’s normal to have to do this.
Once your plugin is installed and activated, it will look like this in your plugin list. To edit the settings, click Edit. To deactivate, click Deactivate. Delete will only appear for plugins that are not active because they need to be deactivated before deleting.
 To finish up let’s show you what deactivating and deleting looks like. Click on Deactivate and now the plugin looks like this.
You may also see the following screen shot at the top of the screen depending on what other plugins you have installed. If you do see it, be sure to follow the instructions. 
If you want to delete, click the Delete button that now shows up. The following screen appears. The system gives you plenty of chances to change your mind or to get additional information. If you want to see what exactly will be deleted, click on the Click to view entire list of files which will be deleted option at the bottom of the screenshot.
Click on Yes, Delete these files and data. The plugin will be deleted and you will see any appropriate messages at the top of the screen. As before, be sure to follow any instructions given there.
So there you have it. That’s the basics of installing and deleting plugins on your WordPress Website.
One other thing I should mention here. Some types of WordPress installations do not allow you to change the plugin or they only allow you to select from a few. My first website was like this. I took a course called the Ultimate Internet Boot Camp. During that course, we actually installed and set up our WordPress websites and did our first blog post.
The course was great, but I soon learned some things that I didn’t think were so great. You only had a choice between a few plugins. Most of the ones that were installed were done in such a way that you couldn’t even see what they were and they could not be removed. One of the worst parts to me was that you could not even install a backup plugin so you could back up your site.
I believe the reason they did this was so you couldn’t back it up and install it someplace else. They did not want to lose their rather inflated hosting fee. To get my site off their servers and onto someplace else was quite a job. It required copying and pasting every piece of information on my site to another site. It was really worth it though. Now I have all the freedom WordPress has to offer without any artificial restrictions.
If you are taking a course like that and you want ultimate control over what you do with your site, I would recommend getting off their servers as fast as possible. The longer you wait the more information you will have to move.
If you enjoyed this article and it was useful to you, please leave a comment below. If you like the site, please consider clicking the “like” button in the “Find us on Facebook” box in the left sidebar.
Thanks for visiting!
About Robert Seth
Robert  Seth is a CPA in the Clark County, Washington area who has been serving individual and small business clients for the last 25 years. His business includes a growing number of remotely serviced customers throughout the United States. He’s also a writer and technology expert. He has a passion for improving the lives of others by helping them simplify the complicated stuff in their lives.
